Update: Like this project? Then you’ll definitely want to check out my new-and-improved version here!
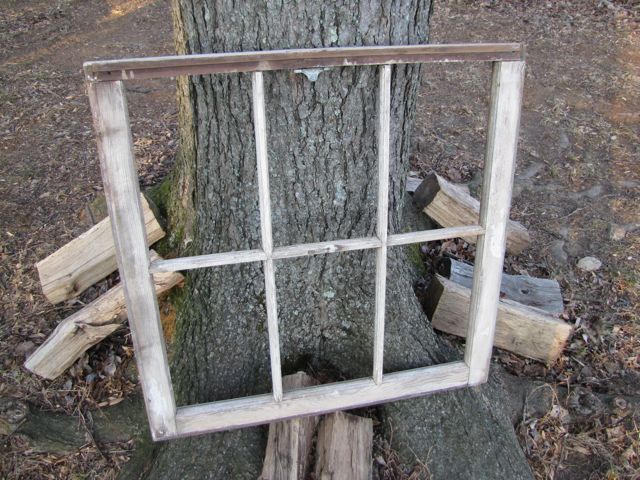
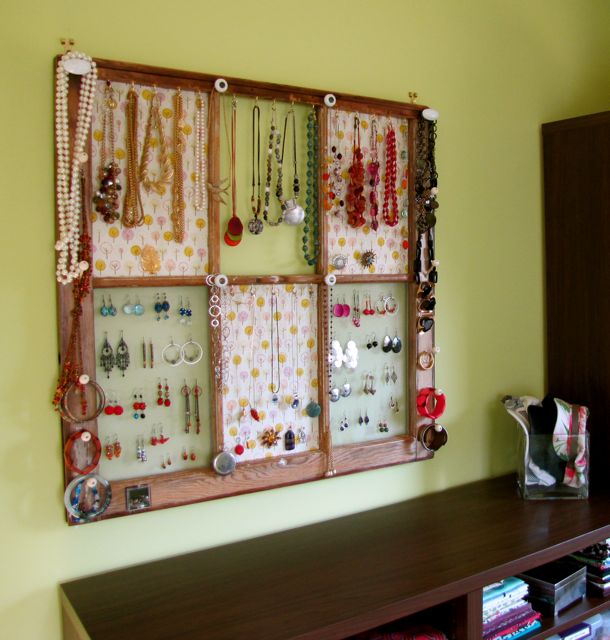
Remember my window-frame-turned-jewelry-display? Of course you do, how could you not? Well it’s time for a detailed tutorial. Here’s the down and dirty on how I turned that ratty old window frame into the Coolest Jewelry Storage Ever.
Supplies Needed
- An old wooden window frame
- Metal window screening
- Foam core board
- Fabric or decorative paper
- Screw-in cup hooks
- Old cabinet knobs
- Skinny strips of craft wood (I got mine at Michael’s)
- ModPodge
- Tiny tack nails
- 2 – 4 Triangle strap hangers (or other hooks for back of frame)
Tools Needed
- Old scissors
- Glue gun
- Old paintbrush
- Hammer
- Drill (optional)
If you have any questions, or if this is confusing, please ask in the comments!
Repurposed Window Jewelry Frame Tutorial
1. Find an old wooden window frame. Rattiness optional.
2. Clean it up, sand it down, and paint it if you want to. At least swab it with a good coat of polyurethane to seal it and protect it. *If there were glass panes, after you remove them, be sure to use pliers to pull out the little metal spikes that held them in. But be careful – they’re sharp!
Note on Poly Sealant: Because the wood was so old and splintery, I thought it best to sand it down and seal it with poly. Unfortunately the poly took away the gorgeous, weather-beaten white patina of the wood, and made it look like regular stained wood. If you want the white look, you’d probably have to whitewash it after sanding it down.
Lead Paint Warning: Old windows may contain lead paint. Exercise caution when refinishing them.
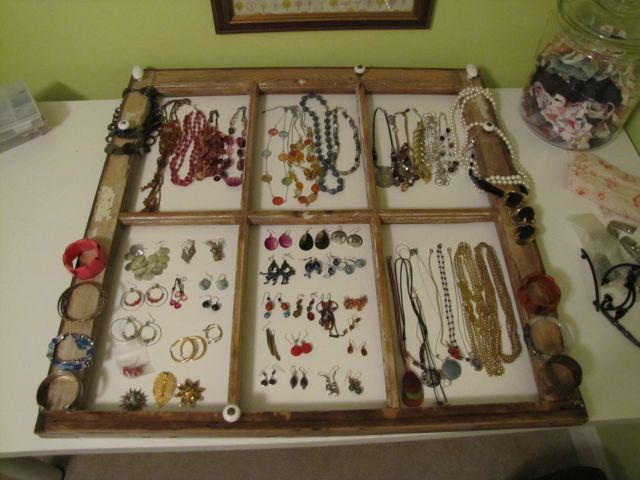
 3. Is it dry? Good! Figure out which squares will have window screening for earring storage, and which will have fabric-covered foam core board panels for decoration & functional space. (Remember, you can stick pins in the foam core boards to provide extra hanging bits for little pendants and pins.) I figured out what kind of storage I needed where by laying all my jewelry out around the frame ahead of time:
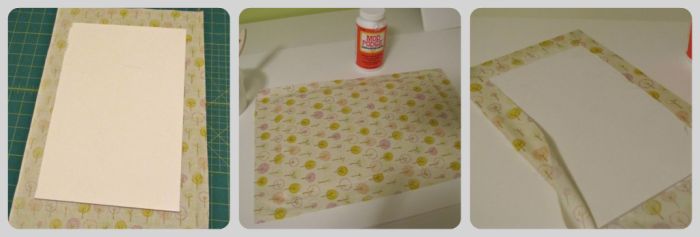
4. Create the fabric-covered panels of upholstered foam core board. Take the fabulous fabric you’ve chosen (or decorative paper), and use ModPodge to adhere it to the board. I chose this process: brush a coat of MP on the board, then press the board to the back side of the fabric, then wrap the edges over the board, using more MP to adhere them well. Set aside (preferably in a pet-hair-free place) to dry.
5. Prepare to install the window screening panels. But watch out, because no matter how hard you try, you’re probably going to get some metal splinters . I recommend having a current tetanus shot for the sake of full legal disclaimer.
6. To get this screening business started, cut a spare piece of cardboard to the size of the square opening you’d like to fill. This is your guide.
7. Cut the window screening. Cut the screen an inch wider than the guide, on every side. (Regular scissors worked for me, but be warned it will make them dull.)
8. Insert one piece of screening where you want to attach it. But before you try to attach it, just fold the edges so that it fits as well as possible. (This is probably where the splinters will start.)
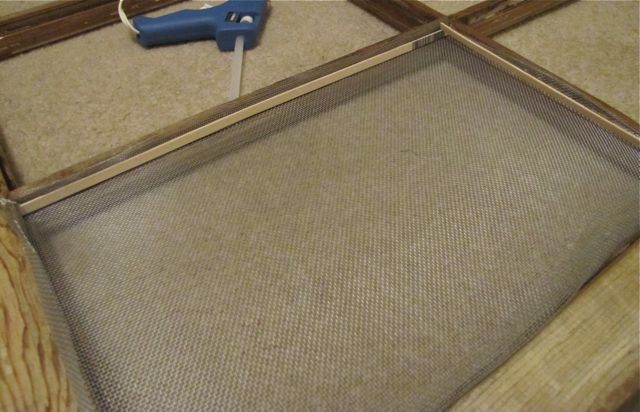
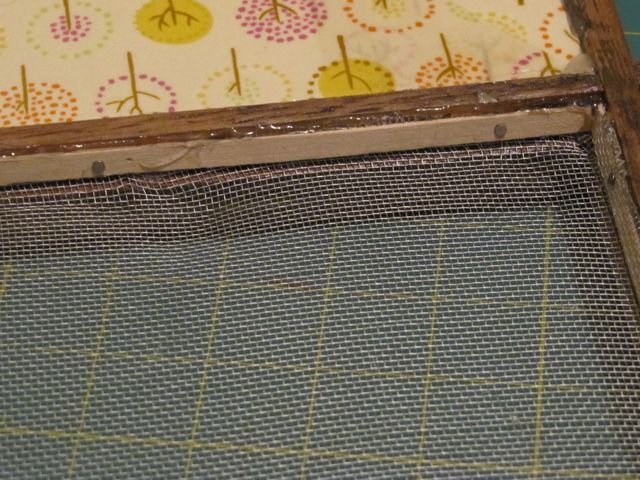
9. Once the screening is in place, cut pieces of the skinny craft wood to insert on top of the edges of the screen. You’re using them like this, to help brace the screen inside the window frame:
10. Carefully pull one of the the screen & wood strip edges away from the frame, and run a quick line of hot glue down the side of the frame. Then press the wood & screen against the glue so that both the screen and the wood strip are adhered to the side of the frame. Repeat on each side.
11. Once the glue has dried, use little tack nails to secure the wood strips to the sides of the frame, thereby ensuring that your screen is held in well.
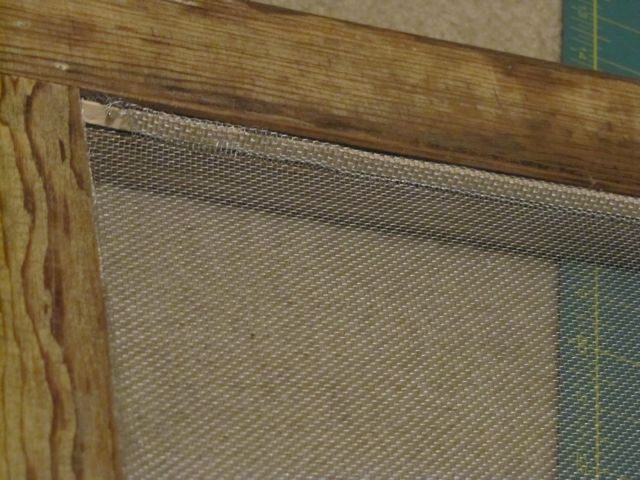
12. Fold any remaining bits of screen over the wood strips. (Again, splinters may ensue.)
13. Add the fabric-covered foam panels, using hot glue to hold them in place. After they are glued in, you can add some extra hot glue to the backside of each corner if you want a little extra security.
14. Install the little metal cup hooks. To do this, mark the spots where you want them to go, and simply twist them into place. If they’re hard to screw in, use some pliers to help.
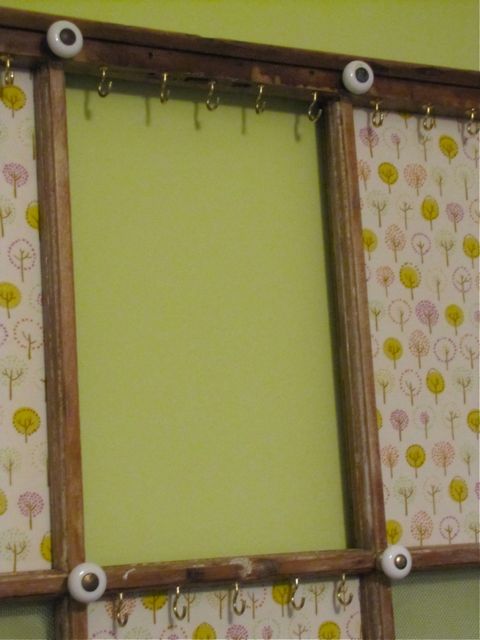
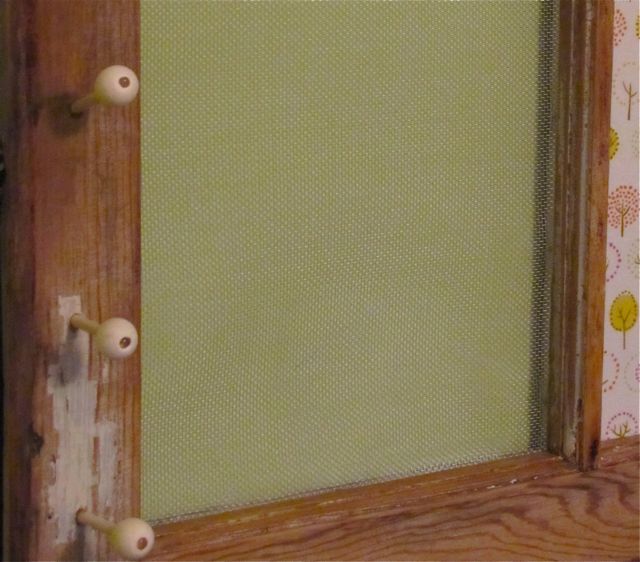
15. Because I also had a few old cabinet knobs, I added them to the intersections where the vertical pieces of the frame met the horizontal pieces, as well as on the top two outer corners of the frame:
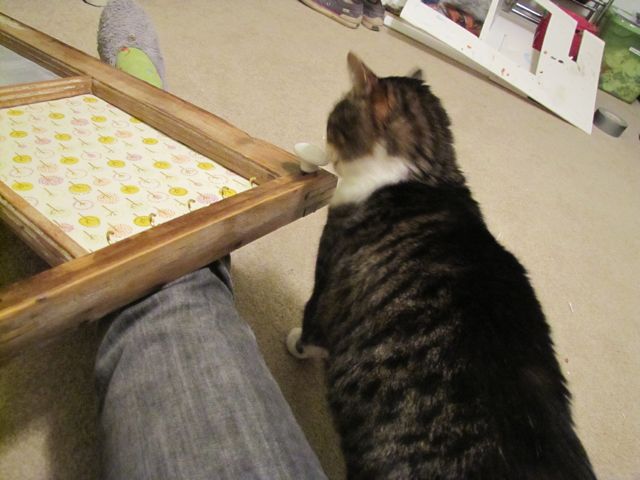
16. Obtain less-than-helpful assistance from the cat. As usual. “No, Doctor, it’s not time for me to feed you dinner. I already did that tonight. Twice.”
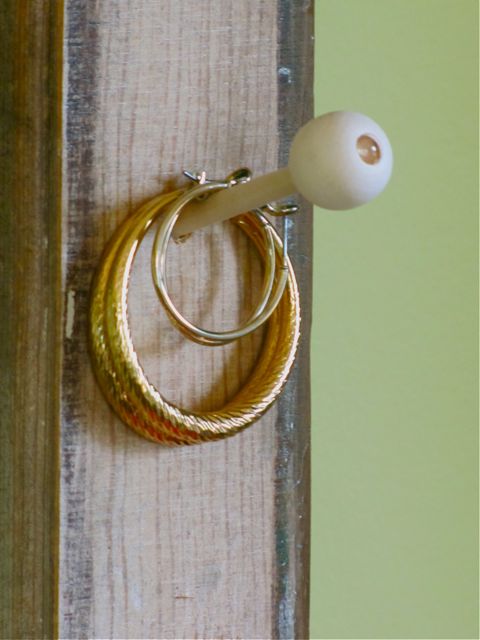
17. DIY some extra knobs, if necessary. Becuase I ran out of knobs, and I wanted to hang chunky bracelets on the outer sides of the frame, I drilled a few holes at a slight downward angle, and hot-glued pieces of dowel rod into them to form my own knobs. I wasn’t satisfied with the boring ends, so I went to the woodworking aisle at Michaels, and found a little packet of round wooden bits with holes in the middle. They fit perfectly over the ends of the dowel rods, so I glued them on.
18. Install Triangle Strap Hangers or D-Ring Strap Hangers (I got mine in the framing section at Michaels) on the top back of the frame, so that you can hang it securely on your wall. And with that, you’re done!
PS: Want to see the rest of my studio makeover? You can check out the beginning of my studio makeover, find details on the patterned dry erase board and cork board, and see how I used vintage jars to store my thread.
PSS: And if you’re still wondering where I was earlier this week, just hop over here to see the lovely ladies with whom I spent my long weekend!
I shared this project at A Beach Cottage’s “Good Life Wednesday Blog Party“!



127 Comments
Love step #16! Priceless. And congratulations on your big win. You are on a roll with these projects!
ah. maze. ing.
you’re so crafty =)
Most Excellent.
found ya via the nester.. great blog, i’m a new fan! i’m a fellow renter, making over our rambling ranch one room at a time. 🙂
great tutorial! i design jewelry, and this is a fantastic idea for storing my finished pieces!!
many blessings,
-Tracie
PS have fun at Blissdom!
I. Love. This. I actually thought about doing something similar for my brooches awhile back. Your idea is much better though. Can’t wait to try this out!
I REALLY like this idea! There may be a little dumpster diving in my future.
WOW and WOW! I am so in love with your jewelry organizer! It’s gorgeous! I am your new follower!!! LOVE IT!!!
Your jewellry organizer inspired me to make my own. I was so into it, I made it in 2 days time, a few hours each day. Not sure how to send you a photo, or to upload it, so I’ll post it under my portfolio section of my other website iCandyGraphics.ca. Thanks!
Great work! You are so good to to give life to your old and broken window frame and change it into a jewelry holder. Creativity and passion always comes in great result. Congratulations!
Love this! I shared it over on my blog today: http://www.brooklynlimestone.com/
I’d love to know how you attached this to the wall. I’ve got a couple old window frames and I can’t seem to figure out how to hand them up without putting screws all over the place.
Hi Loren,
I used triangle-shaped picture hanging hooks. They sell them at Michaels
and Home Depot, among other places. They’re pretty sturdy – I only used
two, one on either end of the top. Then, if you need to stabilize the
bottom more, you can just stick a Command adhesive strip to the back of the
bottom, and press it to the wall.
http://www.homedepot.com/webapp/wcs/stores/servlet/Search?keyword=d-ring+hanger&langId=-1&storeId=10051&catalogId=10053
Hope this helps!
-j
Thanks so much! I will definitely check them out this evening.
I love this idea! Visiting from Brooklyn Limestone! 🙂
Hi there! Found you via Brooklyn Limestone. This is such a great project! Timely, too, as I’m thinking about ways to make my jewelry more visible so I’ll wear it more often. Your cat looks an awful lot like mine, too! Fat, with a white belly and blackish brown tabby top. Too funny!
Thanks Laura! This display was JUST the trick I needed to play on myself in
order to wear all my jewelry more often. And it really shows me what I’m
NOT wearing and hence, should give away.
. . . But pardon me, did you just call my cat “fat?” 😉
Thank you, Jane, for your best idea!
[…] window frame jewelry tutorial […]
So cute! Lucky for me my husband and I do house renovations and we just replaced some windows so I have some lying around.
[…] use several for a space divider. Crafters like to repurpose them for picture frames, wall art, and jewelry organizers. Gardeners know they are great for building cold frames to start your seeds. Ella, one of our […]
[…] to some tips and some inspiration from the lovely Jane at A Borrowed Abode I finally hung it up. I just used a couple D Hooks on the back of the window. Which something that […]
[…] fabric storage installed, jewelry and clothes storage assembled, and a sewing corner created, there were only a few more corners […]
amzing amazing!
It’s really a great way to recycle those old window frames. I once made a cork board and a stationary frame with mine. It was actually a DIY gift for my wife, and I was very glad she liked it! I didn’t have a tubby cat to help me, though for I don’t think it’ll do me good, anyways LOL!
I’ve been looking for something like this. I have 2 windows from my grandparents house and it will be a great way to use one of the windows plus have my earrings out for easier selection.
[…] recyclant une fenêtre –ou un cadre en bois– par The Borrowed Abode […]
This is an incredible idea!
Where did you find the metal window screening? What section in the store would it be found it?
Amazing! Thats a great idea I’m definatly going to have to try and make one 🙂
AWESOME..ALWAYS LOOKING FOR EXCITING IDEAS.
I have small space where I would like to hang this and I’m thinking I would fill one of the squares with a mirror so I can check my look as I’m accessorizing.
[…] bekas. Siiiip… baiklah dicatat dulu.. Untuk instruksi lengkapnya please baca Jane’s wonderful tutorial . Thankyou, […]
How much did you sell this for?
I didn’t sell it, I made it for use in my own home.
[…] project is from: theborrowedabode.com. You can go to her website for a tutorial on how she built her jewelry […]
[…] then, there’s the old window frame idea. They tried to trick me by calling it a jewelry “display.” No, thanks. I […]
I love this! Was going to link to you and use the image (with your info) on my blog, if that is okay! Thanks!
http://www.ameliagrazia.blogspot.com
[…] I used an old wooden window frame to create a great jewelry display and storage solution on the wall in my studio. Get the tutorial here: theborrowedabode.com/2011/01/tutorial-window-frame-jewelr… […]
[…] you are going for a more practical use for your window frame, then this next tutorial for a window frame jewelry display might be for […]
[…] Jane’s philosophy of a place for everything and everything in its place (as evidenced by her jewelry storage and scarf storage projects) then your decor can reflect […]
[…] Studio Fabric & Jewelry Storage Image by The Borrowed Abode I utilized an old wooden window frame to produce a great jewelry display as well as storage solution over the wall in my studio. Get the tutorial here: theborrowedabode.com/2011/01/tutorial-window-frame-jewelr… […]
Love the frame setup, really great advise… thank you!
how did you apply the fabric to the panels with metal screening?
[…] You can find the tutorial here. Posted in Before & After, Organize It!, Secondhand Score, Studio Makeover, […]
[…] Here’s a tutorial for making a jewelry display out of an old […]
[…] Even an old window frame can be turned into decorative storage! Learn how to make your own at The Borrowed Abode. […]
[…] Studio Fabric & Jewelry Storage Image by The Borrowed Abode I used an old wooden window frame to create a great jewelry display and storage solution on the wall in my studio. Get the tutorial here: theborrowedabode.com/2011/01/tutorial-window-frame-jewelr… […]
Just wondering where you found the old window frame
Hi! I found the window frames on the curb in my old neighborhood. But I’ve seen them on Cragslist and Freecycle, or you could post a “wanted” ad on Craigslist. Maybe the Habitat for Humanity Re-Store would have some, too?
Hope this helps!
Love it! I have some old windows from my parents old house…I will always have a piece of the house that I grew up in!
Love this! Thank you for the tutorial. (I found it via Pinterest.)
I have been looking for something for so long as my collection grew and WOW and am I ever happy I found you. What a wonderful, unique jewellery organizer. You are very inventive. thanks a lot. U can be sure there will be one in my room by the weekend. Can’ t wait to see my jewellery all organized. Thanks again and I have saved your site,.
Thanks so much! Hope your project goes well – would love to see a photo of it when you’re done! 🙂
-Jane
[…] an old window into a jewelry display…love this […]
Hey there! Just wanted to let you know we featured you in our Favorite Find Fridays post over at Whimsically Homemade. We used one of your pictures. If that’s a problem let us know and we’ll remove it immediately. Thanks for your great inspiration!
Thanks so much!
[…] a mirrored spice shelf. Other ideas around the web include a beautiful fireplace screen, a nifty jewelry organizer, and a porch […]
[…] had my eye on something like this for a while: Window Frame Jewelry Display {Tutorial} | The Borrowed Abode: Apartment and small space decorating t… __________________ Byron,GA> Charleston, SC> Jacksonville, FL> Guilford, CT> […]