

A few weeks ago I spent 6 hours organizing our tiny coat closet. What is wrong with me?
I mean, really. Who spends 6 hours organizing a closet? Me, apparently. And it was supposed to be a quick-n-easy project. But in the midst of emptying out the closet, I stood there trying to decide if I should paint it. But then I was inspired to try something. Something ridiculous. Could I use contact paper to “wallpaper” the walls?
I decided to try out a little rental-friendly decorating trick on the off-chance that it worked. And it did.
 Here’s how it went down.
I must warn you: our closet was mortifyingly messy. When we moved in I decided to “just put stuff in there” and not worry about it until winter. But I didn’t get to it in December. . . or January. . . and with spring looming over the horizon, I decided I couldn’t take it any longer. Time to launch operation closet cleanup.

So on that fateful day, I yanked everything out of that sorry excuse for a closet.
First, I measured the width of the wall. Then I cut strips of the contact paper to size.

Next, I peeled the backing off the piece of contact paper, and carefully pressed it onto the wall. It took a little patience to get it smooth and straight, but it was not at all the nightmare I thought it would be. Thanks to its “easily-removable” nature, when I found the paper going on crooked I was able to just peel it off and try again.
*I found that it worked best if I lined up the side of the contact paper along the wall seam first, then smoothed it horizontally across the wall. I allowed about a 1/2 inch overlap between sheets, so that if it wasn’t exactly straight you couldn’t tell.
Here’s a little action shot, because – being the good blogger that I am – I tried to photograph every step of the process. Note that I didn’t worry about matching up the pattern perfectly at each seam. Actually, I didn’t try to match it at all – because I didn’t want to waste paper. Heck, I don’t even know if matching up was possible for this pattern. It’s busy enough that you don’t really notice. And remember, perfection is not the goal. It’s only a closet, after all.

Several hours later, when I was almost done covering the walls, I ran out of contact paper. It was then I knew I was in love with the idea, because I ran off to Home Depot (again) for a second roll – so that I could finish the top of the closet walls. I think I’ve finally learned to do things the right way, even if it means they take longer.
 But back to the faux-papered walls. Once I’d covered each wall, I wanted to have straight, tidy seams at the corners, so I held a straight-edge to the corner and ran a razor blade lightly down the corner, trimming the uneven ends.
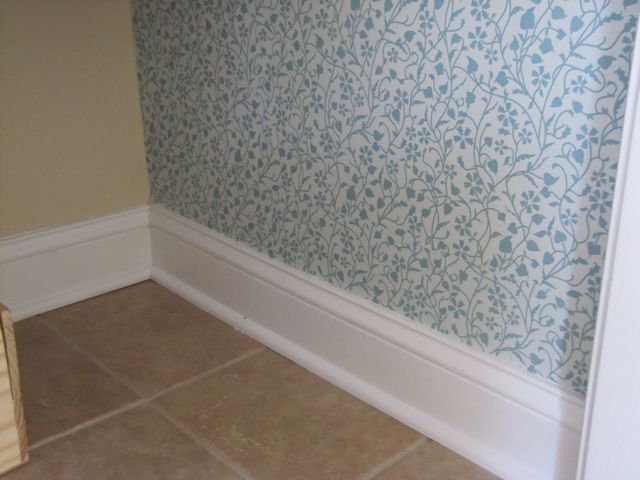
I love how this crazy decorating idea worked out.
I am not sure how it will hold up over time, so I’ll be sure to update you in a month or so. My gut feeling is that it will stay put, because that stuff has some serious cling to it. In a month or so I intend to carefully peel some corners back, to see if the paper can be removed without damaging the paint. Again, the product is supposed to be removable as a shelf and drawer liner, so here’s hoping the same holds true with walls.
As for the total cost? $12 for two rolls of contact paper. That’s a price I can live with.
And I have 2/3 of the second roll left, so that’s a bonus.

This is by far the biggest decorating risk I’ve taken so far, and I can’t guarantee that it works in the long run. But you don’t know if you don’t try, right?
Stop back tomorrow and I’ll share some other fun organizational DIY tricks I used in the rest of the closet!
If you have any experience putting contact paper on your walls, please let me know how it turned out for you! Or if you have an alternate non-paint wallcovering idea that works in rentals, I’m sure we’d all love to hear about that too!
Psst: I’m glad I waited until now to share this project, because it’s just in time for the Nester’s National Take A Risk Day link party! Be sure to visit her and see what risks more fabulous women have taken.
Update: 9 months later I can tell you the closet wallpaper is still holding strong, but peels off safely if I want it to.


70 Comments
This is awesome! I love the pattern you chose. Oh, and I can totally relate. I once started to tidy up our pantry and ended up emptying and painting it. Who does that?! I also blame blog land :).
What a clever, temporary wall-papering technique. And at $12 it’s a steal! Also love how organized your closet is…has it stayed that way? I’ll be back tomorrow for the rest of the details. Congrats on your risk!
Thank you! Yes, the closet is staying organized. I find that once I have
mapped out and labeled a place for EVERYTHING, then I’m good about keeping
things nice and contained. 🙂
this is SUCH a good idea! i rent too and i am always looking for little tricks to make it feel like a more permanent situation without having to spend a gazillion dollars when we move out to get it all back. i am excited to see how this holds up! i may try it some time!
This looks great. Do my eyes deceive me or did you also cover the hanging bar?
So smart! It makes such a difference in there! So much fun, but you know I am quite the sucker for wallpapered or painted closets!
xoxo,
Jen
I can’t wait for the update on this! I am soooo curious how it stays up!!!!!!!! Fingers crossed1 =)
xoXOxo
Jenn @ Peas & Crayons
At my last classroom the radiator covers were covered with contact paper and when I decided to clean them up a bit and put down new paper, the old stuff came right up and I’m sure it’d been there several years at least. I will say you might have to clean goo off of the walls though. It was easier with the thinner liner paper as well.
Christina @ The Scrappy Housewife
looks great! you can also do the same thing w/ fabric and liquid starch!!
Thanks Tracie! Have you ever done the fabric/starch thing on walls?
Where’d you hide all of Ryan’s cokes?? 🙂
[…] 33 Before 33 « Rental Friendly Temporary Wallpaper? {Let’s Take a Risk} […]
great idea!! I like how you did the little cubby hole, too! I’ve got an oooooold family heirloom type glass-front bookshelf that needs a makeover. I’m pretty sure I’d be disinherited if I painted it, and I couldn’t figure out how to do something with fabric that looked good and would hold up….but contact paper! Genius!
“This is by far the biggest decorating risk I’ve taken so far, and I can’t guarantee that it works in the long run. But you don’t know if you don’t try, right?”
I’m glad you’re venturing so far out there in the world of hallway closet decorating. I certainly hope you don’t get blacklisted by the Hallway Closet Home Decor cartel for your edgy space-saving techniques.
Just so you all know, I wanted to start a hallway closet firepit for my National Take A Risk Day link party, but SOMEONE thought it was a little too risky. No sense of adventure! I guess no one gets hallway closet s’mores now. 🙁
If this lasts as well as the temporary stuff I put up on our backsplash, it’s there until you take it down. I like that pattern by the way.
Hey Ryan, g’head, light a fire inside. We dee double dog dare you!
[…] for “Rental-Friendly Temporary Wallpaper {Let’s Take a Risk}” – aka the day I spent 6 hours reorganizing and decorating a coat closet (yeah, […]
great work Jane – I’m on the lookout for temporary, inexpensive ideas for my daughters to use in college dorm rooms.
What is the Pocket Organizer that you have on the inside of your closet door?
Is it mesh or fabric?
You can dip fabric in liquid fabric starch and smooth it on walls. Let it dry and you have wallpaper. When you move just pull it off and wash the wall.
You can dip fabric in liquid fabric starch and smooth it on walls. Let it dry and you have wallpaper. When you move just pull it off and wash the wall.
the problem is that the paint in these apartments I have rented, and these have been very nice apartments, the paint is so cheap that if you wash it it leaves terrible marks behind I have been tempted to try this but to wimpy to try
[…] It’s a photo of my notebook that I’d snapped so that I could show you my planning process when I sit down to tackle a space makeover. […]
Is it still up?
Hi Sandie,
Yes, the contact paper is totally still up on my closet walls – I’m thrilled with how well it worked out!
I wonder if this would work on a cheap, fake wood armoire. It’s very ugly and I would like to put Black and White Damask contact paper over to go with the rest of the room.
I think it just might! I say give it a try – contact paper is relatively inexpensive so I think it’s worth the risk. Let me know if it works out!!
Contact paper works lovely on furniture. Had two dresser tops covered in it for as long as I can remember (25+years). When I decided to repaint them last summer took the hair dryer them and paper came off with ease.
Laura, that’s awesome and great to know! Thanks for sharing!
[…] Installing Temporary & Inexpensive “Wallpaper” […]
My experience with contact paper is that it does not come of neatlly as you say , maybe the new contact papaers are more forgiving, I will give it a try again in some hidden corner and see if it comes off as easy as you say without harming the dry wall
Thank you SO MUCH for this post!!! I have living in white box apartments, and this would be so great to use on outside of sliding closet doors or small walls for accent. Thanks!!
Awesome, glad to be of help! I’d love to see/hear how it turns out for you!
I use contact paper to cover ugly bathroom floors. So far so good!
About 16 years ago we rented a VERY run down house & the landlord was very willing for any help we could give him. The small bathroom was NASTY! But nothing a super cleaning couldn’t fix. I got the tub back to white (I had actually convinced myself that it must have been beige – yes, it was that bad!) and the white tub made the walls look even worse. I had nothing to lose and found some nice contact paper for $1 a roll (on clearance). The store ran out of the pattern I started with but I found a second complementary roll and used it as an accent. It looked great and held up wonderfully! It was easy to clean and the landlord thought it was a vast improvement. I forgot to mention the bathroom was previously done in a horribly ugly and old shower board – think old lady trailer print! I sure couldn’t have hurt that. It was easy to reposition but other than repositioning I don’t have any experience with removing it because it stayed put when we moved. My sister also used contact paper in a mobil home kitchen and it looked great! Same story with her landlord – happy for the update and improvement.
Keri, that’s awesome! And it’s hilarious that the bathtub was so bad you thought it was beige.
I have a question for you…have you tried the liquid fabric starch and fabric on walls yet? I heard one of the tip gurus, who grew up as an army brat, say this is how her mom used to decorate their walls. She said her mom would buy fabric or sheets that she liked and put them on the walls like wall paper with liquid starch. When they moved her mom would wipe it with a damp sponge to remove it from the wall, wash, dry & fold it – fresh for the next house. You can also do this on furniture too. I’ve been a little chicken to try this – wondering about the difficulty of removing any residue from the walls. Supposedly, the residue removes completely with a warm, damp sponge.
I haven’t had a chance to try the liquid fabric starch idea yet. I really want to but I have to find a fun fabric and a good place to do it. Maybe in a corner of the basement just so I can try it. Hopefully I can do it and let you guys know how it works.
is fabric starch the same as laundry starch? and would home made starch work ???
(: REALLY love the idea!!!!
Hi Olivia, Fabric starch (as far as I know) is the same as laundry starch. I haven’t tried this with homemade starch – I think to be safe I’d go with store-bought. Hope this helps!
I did this yesterday and it looked GREAT, but then it came tumbling down by the time I was about to go to bed. Mine is in a closet too, any suggestions? I have to say, after feeling so proud and happy about it, it was really disheartening for it all to come down, so if I can’t make it work this time, I might scrap it! Thank you!
I re-did my rental homes’ kitchen 3 years ago. There was original, textured, filthy wall paper hanging on the wallls when I moved in. I removed all of the wall paper, washed the walls and waited a day. Then, I pain-stakingly cut, trimmed and hung the contact paper. Took several days and some help from a friend for the high spots, but HOLY COW!!! My hard work paid off. It looks like a kitchen that actually belongs in this century now! Landlord LOVES it, too! Be sure the walls are very clean before hanging, as any little dust or lint will interfere with the stickiness. Still hanging beautifully 3 years later. Going to re-do my bathroom this summer.
Alicia, that is AWESOME!!! Seriously, way to go.
Years ago, when my husband was in the army, I decorated out kitchen with contact paper. We were there several years and it stayed great. This was when the “Contac Paper” really stuck, so I had to paint the few areas on the wall that I did. It held up and came off great on the counter tops. Like one of the other people said, there was some sticky residue, but lighter fluid took it right off. Good luck.
Now there is so much peel and stick stuff out there, that you can do it almost anywhere.
Also, to the lady that was thinking about the furniture, decoupage is great for furniture.
Contact paper works lovely on furniture. Had two dresser tops covered in it for as long as I can remember (25+years). When I decided to repaint them last summer took the hair dryer them and paper came off with ease.
I love this blog!! Has anyone tried contact paper on wood paneling? I am renting and it looks horrible!!
Hi Kate! Oh gosh, I can imagine how awful it is. I haven’t heard of anyone doing it, but . . . I suppose it’s worth a try! I just asked on my facebook page, too, in case anyone has experience with it.
Funny that
someone should ask that, because that’s how I found this blog! That is exactly what I want to do but was hoping someone else had tried it first!
That’s awesome! Good luck!
Your closet looks amazing! I was actually trying to find an answer as to whether or not I should contact paper the walls of my bathroom. It’s not actually my bathroom, my toilet is in its own little closet and I wanted to do the walls in there. Is the contact paper still good in there, or was it good until you took it off (if you have)? Thanks for your answer! I appreciate it!
Hi Maria! I haven’t removed the contact paper – it’s still going strong! However when I peeled back a corner to check it the walls appeared fine. I hope it works out for you!
Thank you so much for the reply!
My mom used to do this at our house when I was a kid. The contact paper lasted many, many years and she did whole walls in the bathroom and two in the guest bedroom to add color. I am going to be doing the same in my new house in a few months.
I’m interested to hear if contact paper ruins paint on walls? I can’t figure out how old this post is so I’m interested in hearing if anyone had had experience taking it off.
Hi Brooke! I hung the contact paper 4 years ago. I’ve since tried peeling a corner away, and it has not hurt the paint on my walls at all. Hope this helps you decide if you want to try it!
I just bought this used mobile home and was wondering if the contact paper would stiick to wallpaper that has yellowed from heavy smoking…. I have tried scrubbing the walls but I have arthritis and I need to find an easier way to cover these awful walls……please someone help…….alone and bewildered
Mollie – I am not sure if the paper would stick well, honestly. I think that perhaps you could paint over them if you used a good primer that would block stains (like Zinssner). But I know painting may be too much if you are dealing with arthritis. Perhaps you could get a friend to help? Good luck – that sounds like quite a challenge.
I absolutely love this idea I was trying to find a cheap way to bring life into my apartment rental without damage and I was looking for wall paper ideas for peel and stick. I love this idea what brand of contact paper did you use?
Hey Jacqueline – thanks so much! Glad to help inspire you. I used whatever I got at the Home Depot a few years ago, but now there are so many more pretty options available. I would suggest doing a test spot with whatever you buy just to be sure it works ok. Good luck!
My mother covered the walls in her utility room at least 40 years ago and it is holding up as good as the day she put it there. Honestly! This is in a small room with washer and dryer, so very warm. I’m hoping it will peel off so I can paint the room, as it’s now my house and 70’s brown and gold flowers are not my thing. I’ll update if it works.
Wow! That’s incredible! I am curious to hear what happens when you remove it. I hear you on the 70’s brown and gold . . . 🙂 Good luck!
[…] Rental Friendly Temporary Wallpaper? {Let’s Take a Risk} […]
[…] Rental Friendly Temporary Wallpaper? {Let’s Take a Risk} […]
I’m so glad you kept your word about updating us with the removal results. I move Saturday and really want to settle in with this apartment and make it home. I have a feeling I’ll be buying a lot of contact paper in the next couple weeks. Knowing this comes off easily is a big weight off my mind and its full steam ahead.
I’m wondering if this will work in my kitchen. I was going to buy clear contact paper and cover one kitchen wall. I was going to use that as my grocery list/monthly planner. Should I be 100% confident and try it or maybe not take such a big risk?
Thanks
Hi there! While I can’t advise on whether or not it is guaranteed to work, I can tell you that several years later we still do not have any issues with it in our closet! I did see that there are some super huge whiteboard contact papers that you can put on a wall – I saw them on amazon. That could work too! Good luck!
[…] rental friendly temporary wallpaper lets take a risk the Wall Liner Paper Best Wall Liner Paper Gallery Size: 480 X 640 | Source: theborrowedabode.com […]
[…] rental friendly temporary wallpaper lets take a risk the Liner Paper For Walls Liner Paper For Walls 2016 Size: 480 X 640 | Source: theborrowedabode.com […]
[…] rental friendly temporary wallpaper lets take a risk the What Is Lining Paper For Walls Gorgeous What Is Lining Paper For Walls Inspirations Size: 480 X 640 | Source: theborrowedabode.com […]
[…] rental friendly temporary wallpaper lets take a risk the Removable Contact Paper For Walls Elegant Removable Contact Paper For Walls Ideas Size: 640 X 480 | Source: theborrowedabode.com […]
[…] rental friendly temporary wallpaper lets take a risk the Contact Paper On Walls Stunning Contact Paper On Walls Ideas Size: 480 X 640 | Source: theborrowedabode.com […]
This sounds like the fix I’m looking for! Well, maybe, if it can be used as a kitchen back splash. What I’m wondering is if it can be used on textured walls? I tried a Dollar Store roll, behind the range, but ended up having to tack it in the corners.