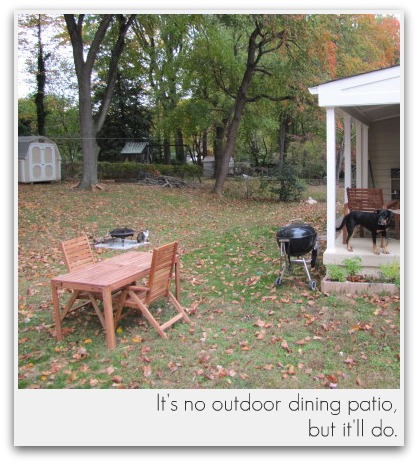
I’ve been keeping our backyard/patio progress a secret from you! Here’s a quick recap since it’s been months since I discussed the space:
- In the end of August I shared our grand plans for installing a patio off our back porch, with the $400 cost being split between us and our landlord.
- One week later we put the brakes on that plan when we realized we’d underestimated the costs by about $350.
- We set about figuring out a new, much less expensive solution for our backyard / patio dilemma.
Here’s the problems we were trying to tackle with that plan:
- Our back porch was just a tad too small for people to sit at all sides of our outdoor dining table. In other words, there was always a danger of someone pushing their chair back from the table and falling off the side of the porch.
- The ground directly around our back porch and back of house was muddy and uneven, making it less than ideal for setting the dining table on – not to mention it looked just plain ugly when entertaining!
- We wanted a fire-safe space on which to use our above-ground fire pit.
- The area along the back of the house, where the trash cans and hose sat, was not draining well – creating yet more mud for the dogs to splash in.
Part 1: Creating an outdoor dining table space.
We decided to throw an outdoor rug down over the scrubby area, in the hopes that it would make it look better, keep the mud off the dogs’ feet, and define a space upon which to set the dining table. When I found this tough and colorful recycled plastic rug on Amazon (no longer available), I knew I’d found a winner – because, according to Gaiam (the company that sells it), it was “handcrafted by Thai artisans who receive a fair wage for their craft.” Hello, fair labor rugs! And at $39 for a 4×6, it was affordable, too! (If only my living room rug search was that easy.)
 Because 4×6 was the only size offered at the time (they now offer a a 6×9 for $89), we ordered two rugs. We couldn’t have been happier with the purchase. However, our scrubby ground was so uneven that they looked awful when laid over it. Backup Plan Fail.
So we tried a 3rd approach. We just plopped the dining table and chairs down on a flatter area of the yard, still near the back porch, and called it a day – with the “making a spot for the dining table” part of the plan, at least. Maybe it wasn’t the most glamorous outdoor dining space, but it was perfectly functional. And for a couple of renters, it was good enough – at least until next spring.
 So that’s the first – and least exciting – stage of the backyard & patio makeover. It’s time for me to hit the sack. Stay tuned for the next installment, when I’ll show off our new outdoor living room, and share how we put those two rugs to good use!


4 Comments
Hey, there’s nothing wrong with a good Plan B. What program did you use to design that diagram of your back yard? Excited to see the rest!
We have that exact same rug, love it! How great your landlord was willing to go in halves with the cost, it’s wonderful to have someone who will work with you when you want to make updates.
[…] Projects & Ideas « Backyard & Patio Makeover: Part 1 […]
[…] our dining room table relocated to a flat spot in our backyard, we had a lovely, empty, covered back porch to play with. Wahoo! […]