Category Archives: Wedding

Our Wedding Table Decor & Flowers

As part of my Jan/Feb goals to “finish abandoned tasks,” I’m sharing this long-procrastinated wedding post. :)

I briefly summarized a lot of the decor aspects in my Big ‘Ole Wedding Recap post, but I wanted to do a separate post to go into a little more detail about a few things; mainly the table decor which we did on a nice and tiny budget.

I also noticed afterwards that some of my ideas looked awesome, but others did not. I want to share my thoughts on the good and the bad in the hopes that it may help others down the road.

FYI on the theme: I attempted to blend tropical with rustic, because a part of me would have loved a typical barn wedding.  :) If I had all the money in the world I would have paid a designer to do really fabulously styled tables, because I am crazy about well styled parties, but we’re not millionaires and we wanted to splurge on other things, like the fireworks.

Caribbean Wedding Tent Decor Herrington on the Bay  | The Borrowed Abode

Wedding Flowers – Or Not

Estimates for tropical floral arrangements for the reception were around $2,000.  Regular flower arrangements? Still high at $1500.  Holy cow was that expensive, and not a cost I could justify.  I shopped around and found that we could use live orchids on the tables for about $400 total, and the orchids could be given to guests afterwards. We didn’t need bouquets, either, because my bridesmaids were each carrying a floral clutch.

When my attempts to source the orchids from local nurseries failed – either from lack of their communication or poor quality flowers when we visited – Ryan and I picked up 2 dozen Virginia-grown orchids from our local Whole Foods Market, and I negotiated a 10% discount on the purchase.

Orchids for Wedding Decor  | The Borrowed Abode

In addition, I ordered 200 fresh orchids (to scatter on the tables) from Hawaii Flower Lei.  At $40 after shipping, I thought that was a pretty frugal way to add more fresh orchids to the decor. The only problem?  I ordered them in white, but they were out of white so they had to send purple instead.  The purple didn’t look quite as elegant, it was a little more random on the tables.

Wedding Sweetheart Table | The Borrowed Abode

Dining Table Decor

In addition to orchids, I wanted to have burlap runners on the tables (you know, for that “rustic” element.)  I love how the bridal party tables turned out:

Burlap Runners Caribbean Colors Wedding Tables  | The Borrowed Abode

The long burlap runners worked well, and were so cheap and easy to make.  I bought burlap yardage with a 50% off coupon at JoAnns, so it was around $2 a yard, then I cut it into lengths that would fit the long, rectangular tables.

The little chalkboard place cards were made by my friend for the bridal shower, so I re-used them and made a few more for the guys’ seats.

Burlap Orchid Wedding Tables  | The Borrowed Abode

Each round table was decorated with a round burlap circle, a live orchid plant, votive candles, and  fresh orchid blossoms.  I used tea lights because, after cleaning wax out of over 100 of the rounded candle holders that my friend had bought for her wedding, I was not in the mood to fill them with wax again.  The white tea lights from Partylite came in clear plastic shells and burned clear, so they were the prettiest simple solution.   And they were Made in the USA!

Back to those round burlap circles.  Those fall into the “mistake” category.

I did the circles because I don’t like the asymmetry of having a rectangular runner across a round table, but I thought I needed burlap on every table.  Looking at the photo below, I see that the tables would have looked more elegant without the burlap, or with a much wider burlap circle:

Burlap Orchid Caribbean Wedding Tables  | The Borrowed Abode

The colorful napkins (provided by the venue) helped incorporate the Caribbean colors.

Accessory Tables

For the rectangular accessory tables – gifts, wedding favors, escort cards, guest book, etc – I made burlap runners and burlap pennant banners.  To incorporate the lace element from my bridesmaid’s dresses, I hand-stitched some of my grandmother’s old hand-embroidered doilies and linens onto the burlap.  It looked awesome, even if it wasn’t very noticeable under the favors and/or gifts.

Burlap and Lace Wedding Table Runners | The Borrowed Abode

Lawn Decor

Because there was a lush green lawn between the reception tent and the bay, I knew early on that I wanted some “living room” type furniture out there so people could really enjoy their surroundings.  The sofas I wanted were so I went with simple white benches, the cheapest “lounge” furniture offered by the rental company.   In the end they were the perfect choice, because they were so versatile and offered such an open feeling.  They were used constantly by guests through the whole reception.

Table Numbers

Traced the outline of the number using a stencil and a pencil, then painted it with my water colors left over from tweaking the invite sets.

The plan was to put a clear stick in each orchid – you know, the ones that you stick in a plan to display a small card?  But I totally forgot to do that, so there was no simple way for the numbers to be on display.  Whoops.

Watercolor Painted Wedding Table Numbers | The Borrowed Abode

What I’d Do Differently:

Like I said earlier, when I look through the photos I see some aspects that I wish I’d done differently.  I’m not losing any sleep over it, but I do like learning from my mistakes.  So here’s what I’d change:

I’d skip the burlap pennant buntings that were swagged around the accessory tables (favors, gifts, etc).  They were unnecessary and did not look as elegant as I’d pictured in my head.  However, I would keep the J&R pennant that I made for our sweetheart table. :)

I’d skip the burlap circles on the round tables.  Totally unnecessary.  I kept thinking that the tables needed to be decorated because we weren’t going with large floral displays, but the fact is that – as always – less is more (elegant). There is nothing wrong with a simple white tablecloth and a few votive candles.

Affordable, Edible Wedding Favors and a Free Printable

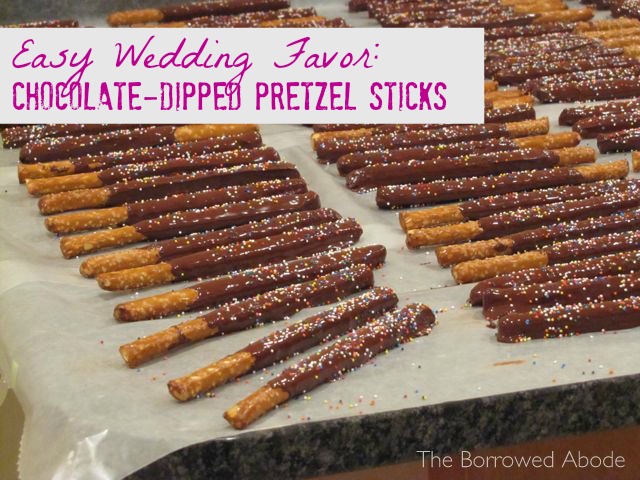
Early on in the planning process Ryan and I nixed the idea of wedding favors.  So many weddings include them, and brides are now spending upwards of $4 a person on a trinket that is supposed to provide a lasting memory to the guest who attended.

And let’s be honest – not many favors appeal to all people, or they end up adding clutter to their homes. And most of the affordable options out there are not biodegradable and are most definitely Made in China.

But at the last minute we decided to offer our guests something sensible and something sinful:  bottles of water and chocolate-dipped pretzel sticks.

Chocolate Dipped Pretzel Sticks Wedding Favor

The chocolate-dipped pretzel rods were a pretty easy project that was accomplished in one evening with the help of a friend.

Did you know you shouldn’t use chocolate chips for coating pretzels?  I learned that the hard way!

After dipping the pretzels, we had some issues getting the chocolate to harden.  It turns out that chocolate chips have additives that help the chips say soft after the cookies are baked.  You don’t want that quality when you’re making chocolate-coated pretzel rods.  Baking chocolate, on the other hand, will harden nicely.  Another option is to use the candy disks that they sell at the craft stores, but I’m not a fan of them because I don’t think they’re great quality and I’m a chocolate snob!

Total cost of wedding favors for 85 people? Less than $100 !

Supplies:

  • Pretzel rods
  • Ghirardelli dark semi-sweet baking chocolate
  • Sprinkles

Here’s how we did it:

  1. Line your counter top with wax paper, if you’re making a ton.  In my case, we had to make 140.  If you’re making a smaller amounts, you can set the pretzels on a baking sheet or across the top of a bowl to dry.
  2. Break the baking chocolate into a tall container.   We used a tall, wide-mouthed mason jar.  You need to be able to dip a good part of the pretzel!Melt Chocolate In Tall Containers
  3. Microwave it, checking every 30-45 seconds to stir the mixture and prevent burning.  You’ll need a pot holder so you don’t burn your hands on the container.
  4. After a few minutes your chocolate should be smooth and melty.   Dip each pretzel stick in, then pull it out and let the excess drip off.
  5. Set it on the wax paper, and then shake the sprinkles onto it before it hardens.Drying Chocolate Dipped Pretzel Rods
  6. Continue the process, re-microwaving the chocolate and adding more chunks whenever it starts to harden.
  7. Let dry overnight to ensure they harden fully before you package them.

It’s so easy!

Packaging the Pretzel Rods

To ensure our treats weren’t wasteful, I ordered skinny biodegradable plastic pouches from Nashville Wraps, my go-to packaging source for Janery.  They were the perfect size to hold two pretzel sticks.

I tied the pouches with ribbon and added fun little tags.  Cute packaging makes all the difference!!   I created the tags using a “thank you” stamp and the same lace stamps used on our escort cards.  The tags were cut with a die cutter from the craft store.

Chocolate Dipped Pretzels Wedding Favors

Easy Personalized Water Bottles

To dress up the water bottles for the occasion, I created some labels with our initials, in our wedding colors.  We then printed them, cut them out, and wrapped them around the bottles, securing them with a small piece of tape. If you’re really particular you can use double-sided tape.

Free Printable Water Bottle Labels

I created the labels in  PowerPoint, and I’m sharing it as a free, customizable printable where you can change the initials, colors, or even the image background if you want to.  At least this way you have a guide to work off of.  It fits most standard small water bottles.

Get Your Free Printable Labels!

Click here to access the water bottle labels. The file will open, but some features (like the chevron pattern) will be missing in the Google Docs viewGo to File –> Download.  When prompted, ask the computer to open the file in PowerPoint.  All the features will then be visible and you’ll be able to edit it!

At the wedding the favors were on a table, with a framed sign in the middle that read “something sensible and something sinful”, with arrows pointing to each.  Unfortunately the table didn’t look as amazing as I’d hoped, because I totally forgot to pack containers for the pretzels.  As a result they were just piled on the table.

I suppose the poor display won’t make or break our marriage, though. ;)

Wedding Favor Table

 PS: If you’re new to the blog, click here for more wedding project posts!

Rustic Window Frame Escort Card Display

My favorite DIY project for our entire wedding was our window frame escort card display, and doesn’t it just figure that I have Ryan to thank for it.

Rustic Window Frame Escort Card Display

Early on in the wedding planning process, I knew that I wanted an awesome escort card display. (FYI, escort cards are the little items or cards that tell you, the guest, what number table you’re sitting at.)

I had inspiration photos torn out of old wooden ladders or rustic boards used as card displays.  But at our wedding planning meeting Ryan suddenly suggested we “repurpose” the other old window frame we had on hand. I was so proud. :)

Back in the beginning of our relationship, he was there when I completed my first successful trash haul: two weather beaten old window frames which had clearly seen better decades. Despite Ryan’s skepticism, one turned into my popular jewelry display frame, and the other languished in our shed, despite Ryan’s begging me to “just get rid of it.”

But not anymore! Here’s how I turned that languishing window frame into a rustic-but-not-splintery escort card display.

I sanded down the frame to remove splinters and rubbed a small bit of white paint on – very unevenly – to keep it rustic.

Sand the Window Frame

I cut thin plywood boards to fit each window opening, wrapped the boards in burlap, and glued and stapled them into place.

Boards for Window Frame

I lightly glued lace trim around all the outer edges, because I love lace on burlap.

Window Frame Escort Card Burlap Lace

Finally, I measured out how many cards I had to hang, then hammered in tiny nails for the cards to hang on. Needle nose pliers came in handy so that I didn’t hammer my fingers.

Tiny Nails in Window Frame Escort Card

I received a lot of help from the cat.

(Maybe he wanted to get hammered?)

Cat Assistance Window Frame

When all the little nails were in (a rather tedious process!), I made tags that spelled out “Find Your Seat”.  It was easy to get perfect letters – I mocked up the phrase in black and white on my computer, then printed it out in exactly the size I wanted.

Window Frame Escort Card Display 3

Then I placed each card over the printed letter and traced the outline, then colored it in with marker.  (Does this make any sense?) As a final touch, I added some watercolor to the bottoms.

Escort Cards

Using a craft punch (found at any crafting store), I cut more decorative tags from white card stock.  I carefully wrote the names of each guest on the front, and stamped the table number on the back.  Then I stamped the edges with mini lace stamps that I found on Etsy.  I told myself that I was cleverly combining the lace part of the theme with the Caribbean aspect by doing the lace stamps in fuchsia, lime, and orange.

They looked awesome, but I didn’t photograph them well ahead of time.

Window Frame Escort Cards

Names have been blurred so that no one has to admit they’re associated with this crazy blogger. :)

After all this work, I didn’t even get to see the finished product displayed at the wedding reception.  In fact I didn’t see much of my decor at all.  The whole night went by in a blur.  But either way, I love how it turned out!

Escort Card Display using Rustic Window Frame

Designing a Wedding Cake

Four weeks before our wedding, as I cleaned up a kitchen that was splattered with icing and cake batter from my wedding cake recipe testing, I decided to order a cake from a decorator rather than do it myself.

It was one of the best wedding-planning decisions I made.

Sunset Ombre Ruffle Wedding Cake by Blondies in North Beach, MD

Cindy, the owner and head pastry chef behind Blondie’s Baking Company in North Beach, MD, was able to squeeze us in at the last minute.  The only problem?  Ryan and I attended the cake tasting with hardly any idea of what cake design we wanted.

Do you want to know the flavors we chose?

  • Chocolate cake  filled with real vanilla bean frosting and fresh raspberries
  • Italian butter cake with a passion fruit filling
  • Orange creamsicle cake – which tastes just like its namesake.

We chose them during our VERY SERIOUS CAKE TASTING, only three weeks before the wedding.

Jane and Ryan Cake Tasting

But back to the style:  As a former cake decorator by trade, I’m picky about cake designs – I’ve seen so many of the designs done over and over, and I wanted our wedding cake to be a design that was new-to-me.

Our theme was Caribbean-meets-rustic with burlap and lace, bright colors, and orchid and hibiscus flowers. I searched and searched for “tropical wedding cakes”, but none of them spoke to us.

But when I found this yellow ombré wedding cake on Style me Pretty, Ryan and I agreed that the ombré effect was the way to go – especially since we had chosen the watercolor ombré wedding invitations and I was totally obsessed with this color trend.

Yellow Ombre Wedding Cake via Style Me PrettyBeautiful, yes, but not us. I’m not sure if you can tell from this blog, but I’m not exactly a prim and proper southern belle for whom this traditionally-designed cake (above) would be perfect. Neither is Ryan, despite the long hair. ;)

Soon after that the ruffles and ombré took over my Pinterest Wedding Cake gallery.

I sent the photos to Cindy, and we requested that the cake be topped with natural orchids and hibiscus in our orange/pink wedding colors. Then a small branch of orchids arcing down from the top of the cake laying against the side of of the first tier.

Cindy loved the idea, but we ran into a slight snag. The florist was quoting her $75 a stem for fresh orchid stems!  That was absurd, so we asked her to go with the much more affordable sugar paste flowers.

On our wedding day, we were thrilled at the sight of our cake. The orange ombré was just like the sunset over the bay, and just like our wedding invites.

Orange Ombre Wedding Cake

In retrospect, I could have designed it more simply. With such a strong, ruffled design, we didn’t need flowers arching over the side of the cake.  A small cluster of white sugar flowers on the top would have sufficed.

But at the end of the day, it doesn’t matter. I loved our cake – it was beautiful and tasty, a true coup for a wedding cake. So good, in fact, that there wasn’t a single slice left over at the end of the night.  But that’s OK, because we know where to get more. ;)