NON-GLAMOROUS PROJECT ALERT! This is all about function over form.
One day in January I got fed up with my box of gift wrap storage. It had lived under the table I built to hide the cat litter, but due to some changes in that space (we’ll discuss that another day) I lost my gift wrap station and the box of wrapping materials just hung out in our basement work room, all disorganized.
I don’t have a lot of wrapping supplies: just a roll of Christmas paper, a few small gift boxes, a roll of brown kraft paper and gift bags / tissue paper.
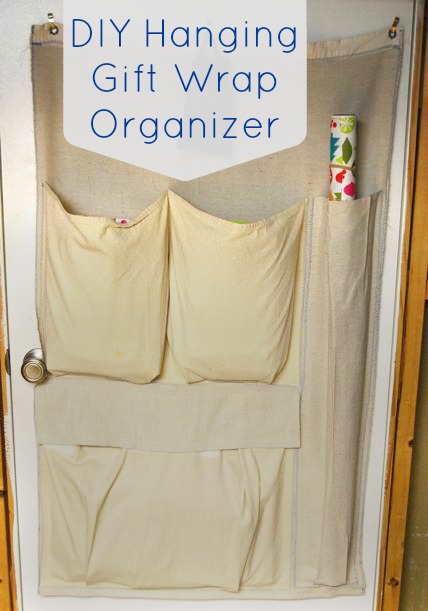
In some random burst of inspiration, I whipped up a hanging gift wrap organizer that fit on the back of our work room door. It isn’t pretty, because I made it quickly with scraps, but it really works well. 
Supplies Used:
- Standard canvas dropcloth material – though any heavyweight canvas would work.
- A scrap of fabric with grommets already installed in it. Grommets are the little round metal linings that make holes in fabric sturdy. I.e. the metal rings around the holes on the edge of a tarp.
Measurements:
- I am not listing any measurements because I created this to fit the back of my door, and created the compartments to fit the wrapping supplies I already had on hand.
How I Did It:
1. I cut a piece of drop cloth fabric a bit smaller than the back of the door. From here on, this main piece of canvas will be referred to as “the backing” because it forms the back, or base, of the organizer.
2. I laid the fabric down and then started placing my wrapping supplies on it, figuring out what size pockets to make, and where to put them. 
3. I made a long tube pocket for the rolled gift wrap: I cut a long, rectangular piece of drop cloth (twice as wide as the roll of gift wrap) to make a tube-shaped pocket.
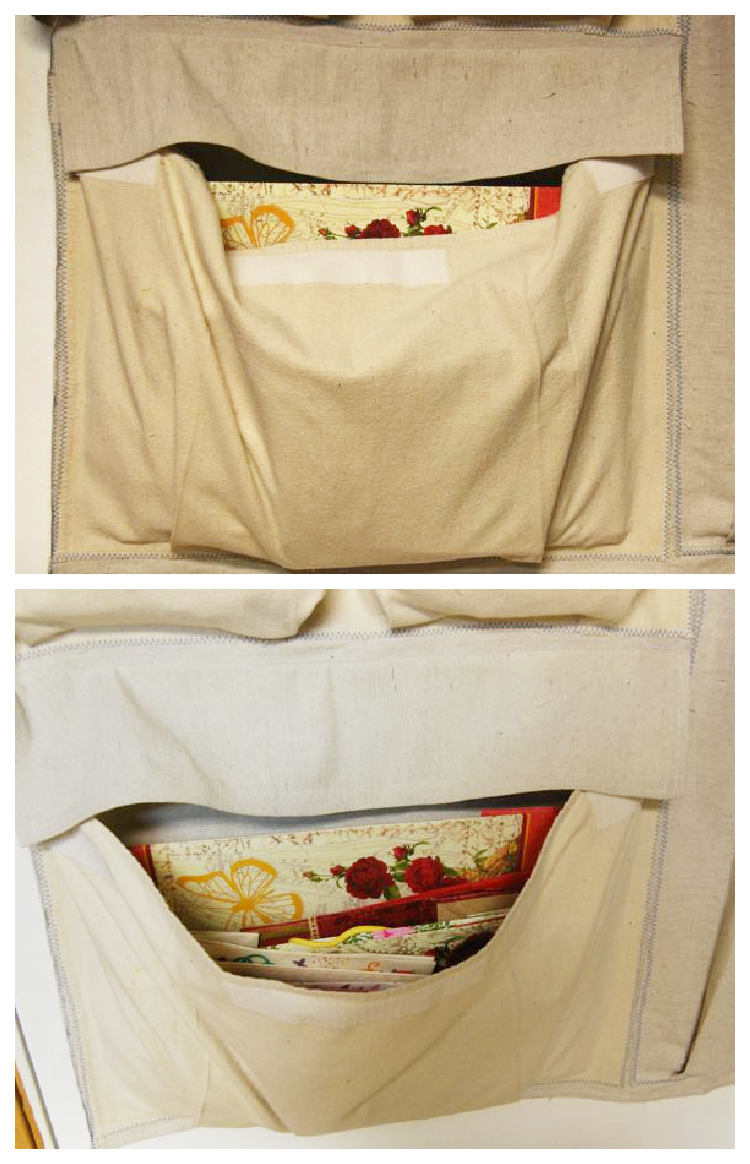
4. I placed that long piece of fabric on the “backing” and I bunched it up so it created a tunnel (See photos above and below) going from top to bottom. I then sewed each long side before sewing the bottom of the long tube pocket.

5. Next I sewed on a large, expandable pocket for the larger gift bags.
To make the pocket expandable, I did two things: I sewed gathers in the bottom of it and I sewed a velcro flap for it so that it could be closed and the contents wouldn’t spill out.
5a) The Gathered Pocket: I cut a piece of canvas about 5 inches wider than the size that I wanted the pocket to be. Then I ironed two vertical folds on it and sewed it into place on the backing. The folds went from the top of the pocket to the bottom, and so by sewing over the two folds on the bottom of the pocket, that made the pocket expandable.
(Photo below shows one of the vertical folds, to demonstrate how it made a gather.)

5b) The Velcro Flap: I sewed some velcro pieces onto the top of the “gathered” pocket. Then I took another strip as wide as that pocket, sewed some velcro onto one edge of it, then sewed the opposite edge to the backing.
When you open the velcro flap, the gathered pocket expands so that you can stuff it as full as you need to. This holds lots of gift bags.

6. I made two smaller, simpler pockets on the top. I cut one wide piece of fabric that was big enough to cover both the pocket spaces. Then I sewed it onto the backing – sewing each side and the bottom. Then I sewed straight down the middle of it, dividing it into two pockets.
These pockets hold gift boxes and tissue paper. 7. I sewed the scrap of grommet fabric to the top of the backing, sewing it several times for added strength. Once that was done, there were 4 grommets at the top for hanging.
I put three Ook Hooks into the door and hung it from them. I had a little bag of tiny mesh gift bags, so that’s the black bag you see hanging from the hook as well.

I sat back to admire my work and thought “Gee, I wish I’d made this prettier and taken more process photos so I could make a good tutorial for the blog.”
Oh well. Some days are like that, even in Australia. (Name that book?)
Seriously, though – despite this being a spur-of-the-moment and not so pretty project, I love how it turned out. It’s doing a great job corralling all my wrapping supplies, and makes it super easy to choose some tissue paper and a gift bag whenever I need one.
If you want to make one and have questions, just ask in the comments! I promise to answer!


3 Comments
Great idea! I recently put a door hanger storage unit in our 2nd bathroom & it freed up 2 shelves of cupboard space. Crazy what you can do with a little creativity to get stuff off the floor, out of cupboards, taking up space, etc. I am scheming more door hanger storage for cleaning products in my front closet and another for the back of the door in my bedroom. I already have 3-4 in play, but in a small space it makes a world of difference to go vertical with storage. I could definitely use a gift wrapping organizer. After I saw your idea i wondered if I could do something easy like this with an inexpensive shower curtain: already has the grommets, could just cut it down to size, use the scraps for the pockets. Thanks for sharing your awesome storage solution!
Is this door solid or hollow? Are ook hooks special hooks?
This door was a cheap hollow door, but any will work. The Ook hooks I used were for a hollow door/wall, but they make all sorts. They are great hooks that come in versions for drywall, brick, plaster, you name it. I find them at the hardware store near the nails and screws. Hope this helps!