Happy 2011 All!
I’m happy to ring in a new year, but sad to have my one week of 100% decorating/organizing time come to an end. It’s been heavenly, even if I didn’t accomplish nearly as much as I’d hoped. I did, however, get about 90% of my studio makeover completed – but you don’t get to see the finished product until the end of the week. Yep, I’m going to make you wait, while I share one step each day.
Chapter 1: A new plan
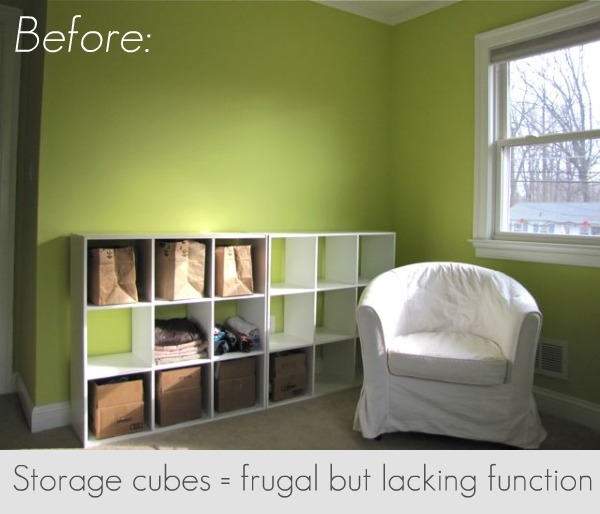
So where were we? Oh right, I was freaking out because the cheap cube storage solution from Tar-jay left me completely unsatisfied.
I hadn’t thought through my storage needs thoroughly enough before hand – a lesson learned the hard way. So that morning, with a grouchiness slowly creeping into my head, I took myself to my local coffee shop and listed out all my options. So many times I’ve settled for a less-than-ideal solution, because of cost or impatience, and I didn’t want to make that mistake again.
- Use the cube storage, buy the fabric bins for the bottom row, and just deal with the pet hair that might get on stuff.
- Build custom solution from MDF or solid hardwood.
- Find an old buffet & hutch cabinet on Craigslist and refinish / customize it. Like this image, which I’ve always loved:
- Finally, I could go to Ikea and buy a customizable bookshelf solution.
So there were my options. When I say I was freaking out, I really was – because the storage was a huge piece of the puzzle. I couldn’t do much else before I had a space in which to stash my supplies. So I slowly listed the pros and cons of each option, which led me to the final solution.
- The cube storage was out, because I was very unhappy with it. Not only did it feel like a kids’ room storage option, it didn’t have the function I needed. The cubes limited the ways in which items could be stored.
- The custom-built solution was out simply because I didn’t have the luxury of time to design, cut, build, and paint it. Especially since I don’t have a saw, and would have to go to Home Depot every time I needed a board cut.
- The scavenged and refinished buffet/hutch idea was tempting, but I quickly realized that we’d need to rent a truck to get one home, and then that would also require time to sand and refinish it. Also, it wouldn’t be customizable to make the most of every inch of wall space.
- Finally, the Ikea option seemed to be the best. The Billy bookshelf system seemed to be modular and inexpensive (relatively), as well as perfectly customizable with doors and different size cabinets to fit the space.
Chapter 2: Doors, Drawers, and Shelves – Oh my!
Ryan and I headed to Ikea. As I looked at all sorts of cabinets and shelving options, I realized that my budget of $200 for the entire room makeover was going out the window. (Fortunately I had enough wiggle room in my finances to do this without reaching for a credit card or making any other financial mistakes.)
After seeing the BILLY shelves, I wanted something deeper, and with the option to add drawers. Then I spied the BESTA system, which offered both skinny (8″) and deep (16″) shelf options. With its customization options out the wazoo (doors, drawers, and shelves ) I realized it really was the “besta” option for me. So I grabbed my notebook and sketched out a plan, until I was fairly confident I knew what I needed.
Ouch. The prices of all the parts started to add up more than I’d wanted: $340. That’s not a lot to pay compared to what other stores offer, but since we’re renting I didn’t want to sink that much dough into something that wouldn’t work well in our future home(s). But I decided to do it, thinking that it could be modified to suit our needs further down the road.
With our list in hand, Ryan and I grabbed one of those awful and ornery Ikea platform shopping carts and forced it down the right aisle. Holy cow, the boxes were heavy. I’m a strong girl, but this was seriously heavy. Ladies, be warned. Do not buy alone.
Chapter 3: Assembly
New Years Eve I assembled my Ikea furniture, Mojito in hand. Since Ryan had already suffered through an unexpected 3+ hour Ikea trip, I did this alone as to not punish him further. The cat desperately wanted to assist, but something told me he’d be no more adept with the screwdriver and brackets than I was. Well, except for having smaller paws, maybe.
Aside from the sheer weight of the boxes, the shelves were really easy to assemble. Totally single-girl-doable.
Finale: Before & After
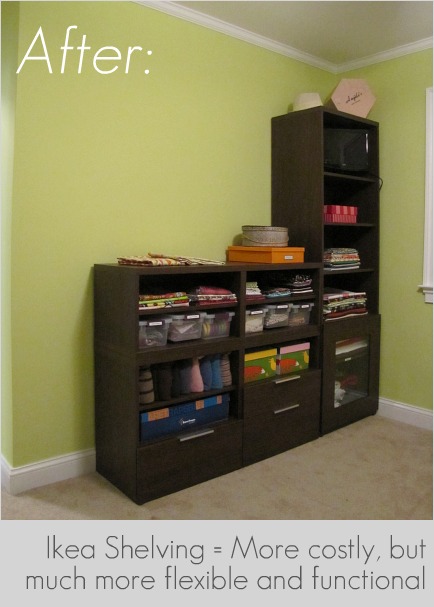
And finally, what you’ve been waiting for – the before and after. Please note that the “after” does not include truly finished organization. At this point i was still figuring out where things went around the room.
The new Besta units allowed me to go up part of the wall, while leaving open space for the jewelry storage system I’m building. At the same time, if my fabric supplies outgrow the current shelving, I can add more height and width to the system. The shelves were the perfect size for stacks of fabrics and my clear plastic fabric sample bins.
There are 4 different heights for the units, and my system is actually made of three units – the tall one, and then a stack of a super short unit on top of a medium short unit.
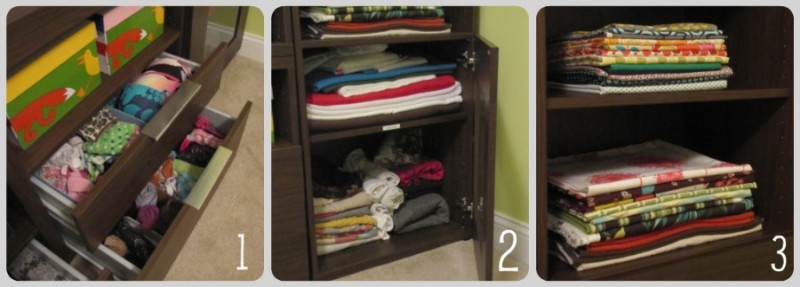
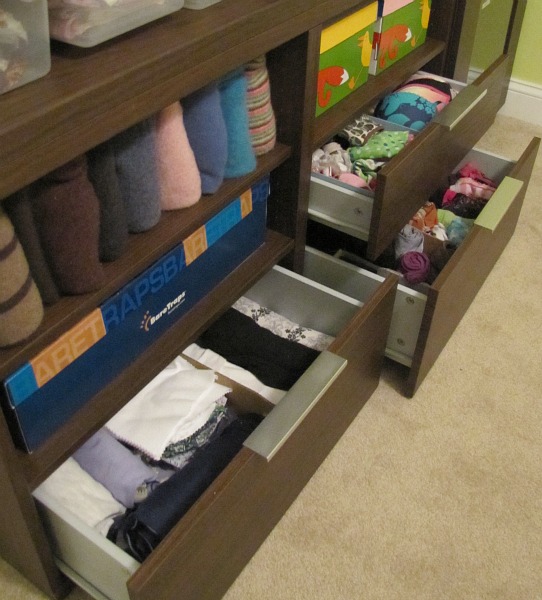
- {1} I chose to use drawers on part of the bottom to hold my socks, PJs, etc.
- I put a glass door keeps pet hair off my stack of “old clothes to refashion” and my stack of winter weight flannel and felt fabrics.
- My heavier-weight fabrics will live in stacks on the tall skinny unit.
Also, my stash of shrunken wool sweaters (for sewing) got stashed on a shelf, and I used boot and shoe boxes to create some storage. Of course, those boxes have to get a good ole’ fabric makeover to really match the space.
In the end I’m loving how this worked out – although there were some moments when I really wished I didn’t have to let go of more than $300 bills. You know I love a good, thrifty, and creative fix, but I think the lesson learned here is that sometimes, if you really know what you want/need, it can be worth spending the money for it when you find just the right solution.
As for those white cube shelves from Tarjay? They were sold within an hour of posting them on Craigslist, and I only lost about $20 in the process. All in all, that’s not too expensive a lesson to learn. And since the budget has changed for this studio makeover project, I’ll just wait a few weeks before spending any dough on the guest room makeover.



8 Comments
I like the look of the BESTA unit– esp with the wall color — I think it is a nice match!
I completely agree with your frame of thinking though — especially as a fellow renter — it is so flipping hard to commit to things to match this house when our real house will most likely be 100% different! I wanted a painting SO BAD yesterday! I had a gift card and everything! It would have cost zero dollars.. and it was gorgeous! But i couldn’t picture it in this house let alone a new home. boo
Glad you sold the target cubes so darn quick! congrats!
ahhh figures! The same thing happened with Rebecca at thelilhousethatcould. WordPress hates my guts!
It looks great and I’m glad you were able to find a solution!! I’m going through something very similar right now in regards to a crafting area for myself. Right now I store all my crafty goodness in a huge buffet in our dining room and when I want to work on something I have to pull it all out and take over the dining table. When I’m done for the day it all has to be put away even if I’m not finished so we have a place to eat. I thought I could deal with it, but after living with it since we moved here 3.5 years ago I’m fed up. I’d like to create a space in our spare room, but after brain storming to try and use what we have I haven’t come up with a solution (no desk kind of hinders having a craft area!). I’m eying a desk and rolling drawer unit at Ikea, but like you I’m hesitant to commit because what if there is a better/cheaper solution I’m missing! Why do we torture ourselves?? LOL On top of the fact we’re moving to CA in about 5 months and I have NO idea what our space will be like since I’ve no clue where we’ll be living I don’t want to regret the investment in the desk if I don’t have room for it when we move.
So glad you’re happy with your choice. It was money well spent!
I’m glad the cubes went so fast. The new unit does look a lot better, much more “serious furniture.”
Nicely done! It’s hard spending a lot of money on shelves that you know may not work in the next place (been there, all too recently), but it really does make a difference in the room’s functionality. I think all that time measuring everything, counting the # of shelves you need, lugging giant boxes, blah blah blah, is totally worth it. And I totally laughed when you decided to give the man a break and put them together yourself. Good save. 😉
[…] There’s only two things between me and my couch, and those things are a) work and b) showing you the rest of the changes I’ve made to my sewing room – this time on the sewing storage wall. […]
[…] along the way I shifted shelving in the closet and on the walls, customized and accessorized, and ended up with a room that was what any room should be: useful […]
[…] cabinets pictured below above are three Ikea BESTA units. I had the bottom two in my upstairs studio, along with one tall unit. The tall guy didn’t fit under the lowered ceiling, so he went […]