Update: Like this project? Then you’ll definitely want to check out my new-and-improved version here!
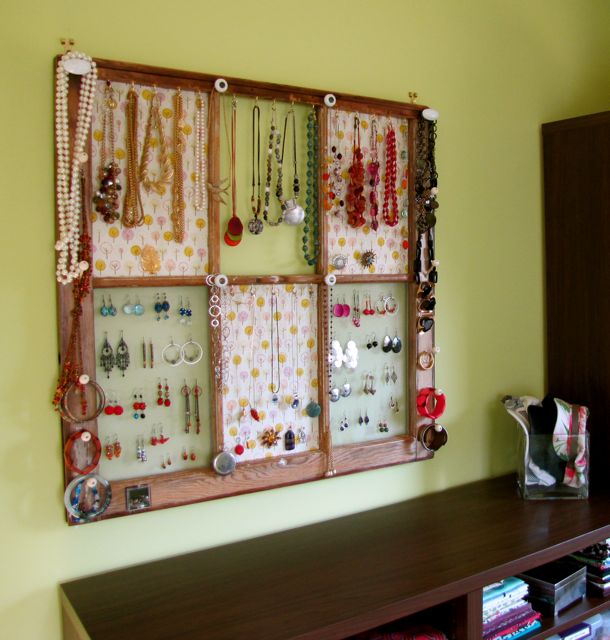
Remember my window-frame-turned-jewelry-display? Of course you do, how could you not? Well it’s time for a detailed tutorial. Here’s the down and dirty on how I turned that ratty old window frame into the Coolest Jewelry Storage Ever.
Supplies Needed
- An old wooden window frame
- Metal window screening
- Foam core board
- Fabric or decorative paper
- Screw-in cup hooks
- Old cabinet knobs
- Skinny strips of craft wood (I got mine at Michael’s)
- ModPodge
- Tiny tack nails
- 2 – 4 Triangle strap hangers (or other hooks for back of frame)
Tools Needed
- Old scissors
- Glue gun
- Old paintbrush
- Hammer
- Drill (optional)
If you have any questions, or if this is confusing, please ask in the comments!
Repurposed Window Jewelry Frame Tutorial
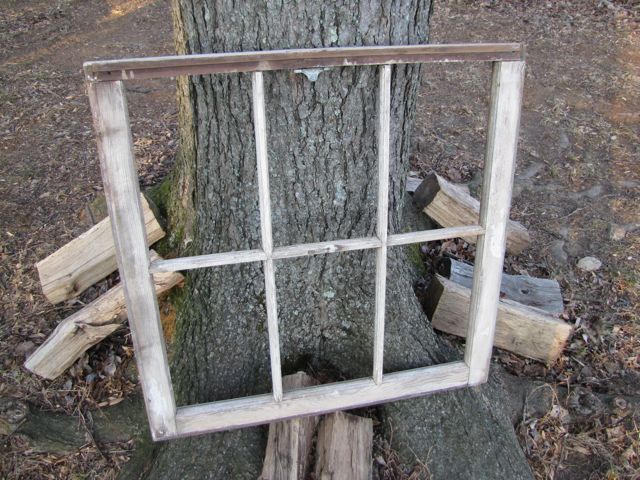
1. Find an old wooden window frame. Rattiness optional.
2. Clean it up, sand it down, and paint it if you want to. At least swab it with a good coat of polyurethane to seal it and protect it. *If there were glass panes, after you remove them, be sure to use pliers to pull out the little metal spikes that held them in. But be careful – they’re sharp!
Note on Poly Sealant: Because the wood was so old and splintery, I thought it best to sand it down and seal it with poly. Unfortunately the poly took away the gorgeous, weather-beaten white patina of the wood, and made it look like regular stained wood. If you want the white look, you’d probably have to whitewash it after sanding it down.
Lead Paint Warning: Old windows may contain lead paint. Exercise caution when refinishing them.
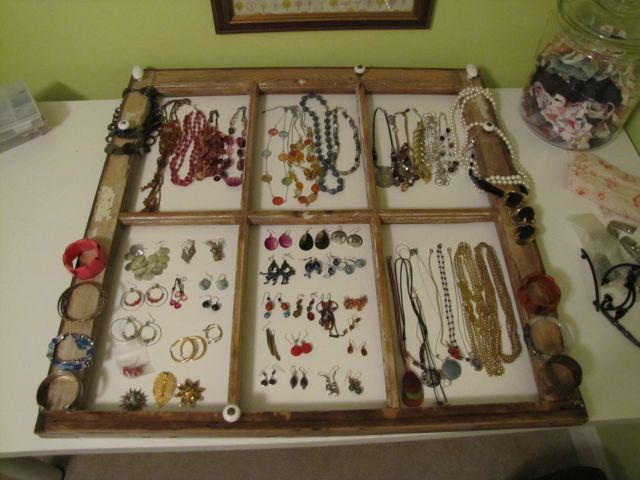
 3. Is it dry? Good! Figure out which squares will have window screening for earring storage, and which will have fabric-covered foam core board panels for decoration & functional space. (Remember, you can stick pins in the foam core boards to provide extra hanging bits for little pendants and pins.) I figured out what kind of storage I needed where by laying all my jewelry out around the frame ahead of time:
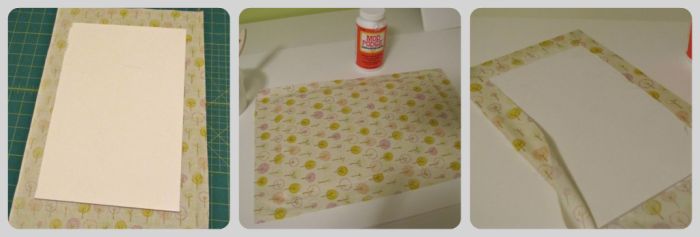
4. Create the fabric-covered panels of upholstered foam core board. Take the fabulous fabric you’ve chosen (or decorative paper), and use ModPodge to adhere it to the board. I chose this process: brush a coat of MP on the board, then press the board to the back side of the fabric, then wrap the edges over the board, using more MP to adhere them well. Set aside (preferably in a pet-hair-free place) to dry.
5. Prepare to install the window screening panels. But watch out, because no matter how hard you try, you’re probably going to get some metal splinters . I recommend having a current tetanus shot for the sake of full legal disclaimer.
6. To get this screening business started, cut a spare piece of cardboard to the size of the square opening you’d like to fill. This is your guide.
7. Cut the window screening. Cut the screen an inch wider than the guide, on every side. (Regular scissors worked for me, but be warned it will make them dull.)
8. Insert one piece of screening where you want to attach it. But before you try to attach it, just fold the edges so that it fits as well as possible. (This is probably where the splinters will start.)
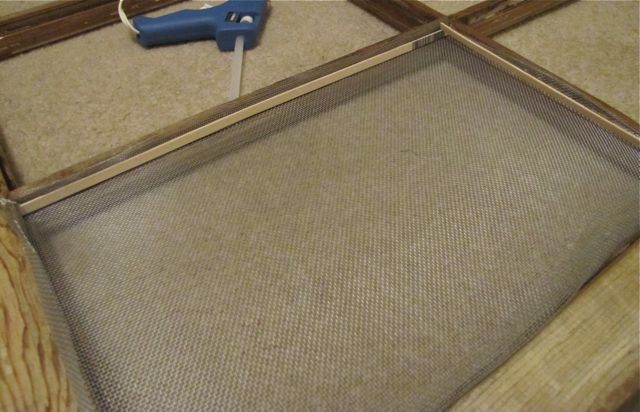
9. Once the screening is in place, cut pieces of the skinny craft wood to insert on top of the edges of the screen. You’re using them like this, to help brace the screen inside the window frame:
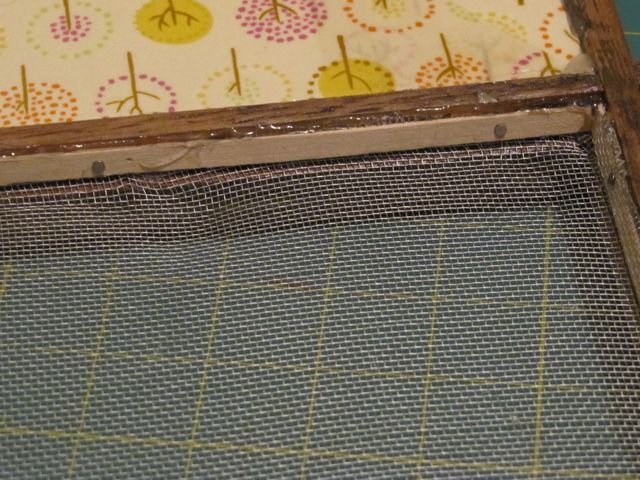
10. Carefully pull one of the the screen & wood strip edges away from the frame, and run a quick line of hot glue down the side of the frame. Then press the wood & screen against the glue so that both the screen and the wood strip are adhered to the side of the frame. Repeat on each side.
11. Once the glue has dried, use little tack nails to secure the wood strips to the sides of the frame, thereby ensuring that your screen is held in well.
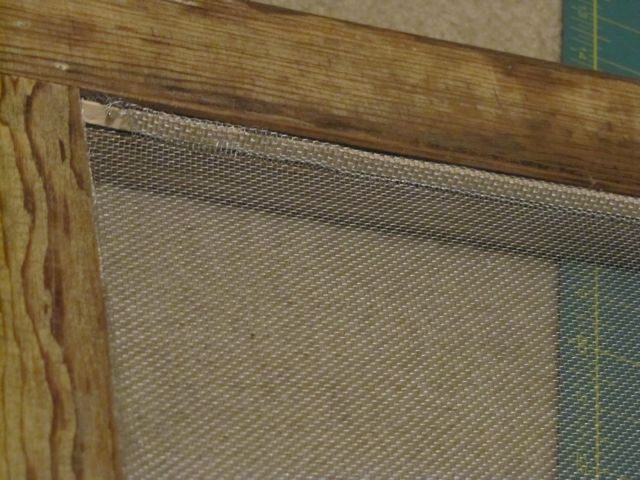
12. Fold any remaining bits of screen over the wood strips. (Again, splinters may ensue.)
13. Add the fabric-covered foam panels, using hot glue to hold them in place. After they are glued in, you can add some extra hot glue to the backside of each corner if you want a little extra security.
14. Install the little metal cup hooks. To do this, mark the spots where you want them to go, and simply twist them into place. If they’re hard to screw in, use some pliers to help.
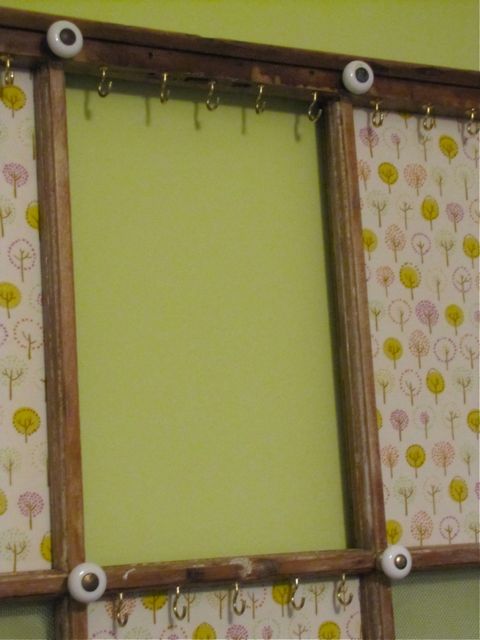
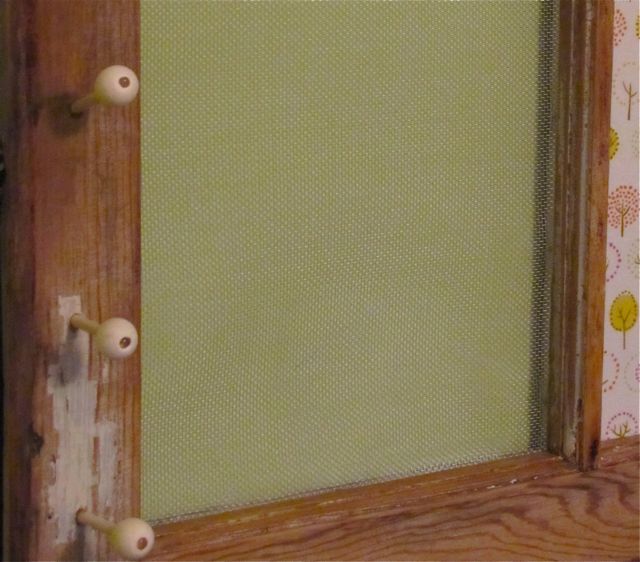
15. Because I also had a few old cabinet knobs, I added them to the intersections where the vertical pieces of the frame met the horizontal pieces, as well as on the top two outer corners of the frame:
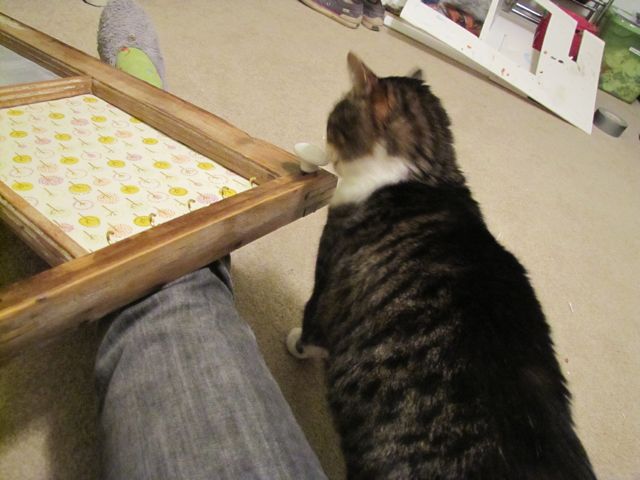
16. Obtain less-than-helpful assistance from the cat. As usual. “No, Doctor, it’s not time for me to feed you dinner. I already did that tonight. Twice.”
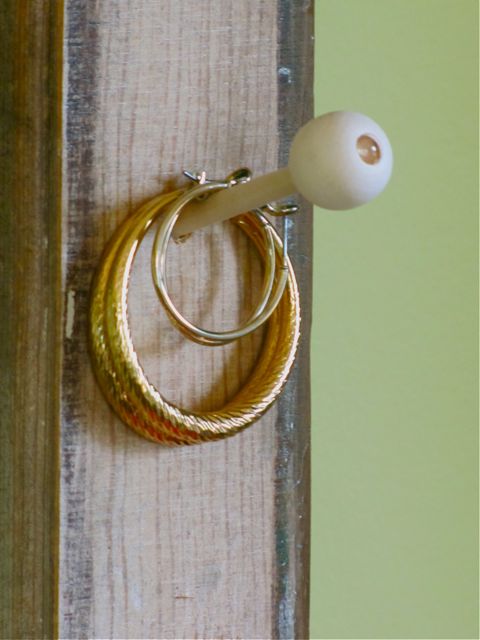
17. DIY some extra knobs, if necessary. Becuase I ran out of knobs, and I wanted to hang chunky bracelets on the outer sides of the frame, I drilled a few holes at a slight downward angle, and hot-glued pieces of dowel rod into them to form my own knobs. I wasn’t satisfied with the boring ends, so I went to the woodworking aisle at Michaels, and found a little packet of round wooden bits with holes in the middle. They fit perfectly over the ends of the dowel rods, so I glued them on.
18. Install Triangle Strap Hangers or D-Ring Strap Hangers (I got mine in the framing section at Michaels) on the top back of the frame, so that you can hang it securely on your wall. And with that, you’re done!
PS: Want to see the rest of my studio makeover? You can check out the beginning of my studio makeover, find details on the patterned dry erase board and cork board, and see how I used vintage jars to store my thread.
PSS: And if you’re still wondering where I was earlier this week, just hop over here to see the lovely ladies with whom I spent my long weekend!
I shared this project at A Beach Cottage’s “Good Life Wednesday Blog Party“!



127 Comments
where do you find the metal window screening?
Hi MacKenzie – Sorry for the delay. I found the window screening at the hardware store, it came rolled up in a tube. I’m getting ready to post an update, just FYI – I made another window frame jewelry display and inserted boards covered in burlap into each window frame. The burlap also works really well for hanging the earrings and stuff.
I have done something similar with a frame and plastic canvas for yarn projects.
[…] a string and clothespin frame from Talia Christine, a plant shelf from Country Sampler, and a cool jewelry organizer and display from the Borrowed […]
[…] This window frame jewelry display is perfect for a teen’s room DIY […]
[…] element – trying to blend our Caribbean color palette with a bit of a country feeling. And another old window frame came out to […]
Almost have mine completed. Just thought I would share a few of my experiences. No luck finding the frame locally, but got a perfect one really cheap off esty.com. Found fantastic colorful assorted knobs at World Market, again they were so inexpensive. I used Elmers Spray Adhesive to mount the fabric onto the boards. Installing the wire screen was the trickiest part. My fingers were definately sore and I punched a hole in one screen when nailing in the brads. It was difficult to remove the damaged piece due to all the glue. Wish there was a better way to install the screen, but I haven’t come up with one. I will probably attach a cover onto the back to help protect it and add stability to the frame as it is pretty old. Since this will be seen through the screened panels I will spray paint the inside a shade to compliment my fabric panels.
kc
Since the screen is an issue and hard to attach safely, try the plastic mesh they sell for quickstich. It will hold earrings very well and you can attach with the wood strips over the edges. The glue will melt the mesh if you glue it directly.
Diane, that’s a great idea! I also just did one with burlap instead of screen. . . the screen really is a pain to install. 🙂
HOW SMART YOU ARE to lay out all your baubles to see how you want to organize and do the project! Great way to weed out stuff you don’t wear as well. And find old/new favorites!
Did I need one? No. Did I have to make one anyway? Yes.
http://www.bagsofcharacter.blogspot.com.au/2012/07/window-frame-jewellery-organiser.html
Thanks for the tutorial!
[…] been wanting to do something like this: Window Frame Jewelry Display {Tutorial} | The Borrowed Abode: Apartment and small space decorating t… THREE BIRDS: DIY: Jewelry Organizer __________________ Byron,GA> Charleston, SC> […]
This is exactly what I have been looking for! Can’t wait for my husband and I to get started on my project… Thank you so much.
Hi Cindy! So glad you like the idea! I just wanted to let you know that I posted an updated version that I think rockes even more – I used burlap instead of wire screening for the earring part and it’s easier to put together. 🙂 Here’s the link: http://theborrowedabode.com/2012/08/my-new-improved-window-frame-jewelry-storage-display/
[…] frames which had clearly seen better decades. Despite Ryan’s skepticism, one turned into my popular jewelry display frame, and the other languished in our shed, despite Ryan’s begging me to “just get rid of […]
[…] Other bloggers like live.love.larson, and A Fish who likes Flowers made some really pretty ones. The Borrowed Abode did a great tutorial as well (and they added knobs that are super cute […]
[…] I blogged about just another trash-to-treasure project: I turned a ratty old window frame into a jewelry display / storage piece. It was featured on some blogs, like Brooklyn Limestone and Apartment Therapy, but I had no idea […]
[…] need something like this for my earrings! Jewelry display from The Borrowed Abode. She has a great tutorial on how to make […]
[…] need something like this for my earrings! Jewelry display from The Borrowed Abode. She has a great tutorial on how to make […]
[…] what’s a little more trash on the wall? After all, the window frame I turned into jewelery storage was a curbside trash pile find. And you can find an updated white with burlap version […]
[…] Full details on how to make this baby can be found in the tutorial post I wrote. […]
[…] Studio Fabric & Jewelry Storage Image by The Borrowed Abode I used an old wooden window frame to create a great jewelry display and storage solution on the wall in my studio. Get the tutorial here: theborrowedabode.com/2011/01/tutorial-window-frame-jewelr… […]
[…] If you’re curious, you can learn about my window frame jewelry display here. […]
[…] Want to see how I created the window frame jewelry organizer? Hop over here. […]
[…] just recently stumbled across this post by Jane at the Borrowed Abode where she turns an old window into a jewelry […]
I love your idea for the jewellry window. I was just wondering if you could send me a close-up pic with the earrings on the screen part so I can have a better look please.
Thanks Joanne
Hi Joanne, Thanks so much for the comment! Unfortunately I don’t have that window anymore. I gave it to a friend after I made a new one using burlap instead of window screening. I definitely recommend the burlap as it is so much easier to work with than the metal screening! http://theborrowedabode.com/2012/08/my-new-improved-window-frame-jewelry-storage-display/
I hope this helps,
Jane
[…] To make an original jewelry display you need an old wooden window frame, metal screening, a foam core board, fabric, some hooks and cabinet knobs. Personalize it according to your own preferences.{found on theborrowedabode}. […]
The display is beautiful! I saw some commenters asking where they could get window frames like that. We have a local store that sells salvaged supplies such as doors, windows, etc incredibly cheap. Maybe other areas would have stores like that. (Habitat for Humanity is one for example) Also, the screen could be stapled to the back of the frame. Another option would be to use nylon screening. No scratches from that.
Hope this helps,
Milli
Thanks, Milli! That is such a good idea about stapling the screen right to the back of the frame. It’s a “why didn’t I realize that!” moment 🙂
[…] zdjęcia: 1 – http://www.bhg.com, 2 – http://www.windowworldportland.com, 3 – http://www.aimee-weaver.blogspot.com, 4 – http://www.theepochtimes.com, 5 – http://www.sweetpapertreats.wordpress.com, 6 – http://www.theborrowedabode.com […]
[…] DIY Project and Photo credit to theborrowedabode.com […]
[…] utensil organizers!!!) See it Here This one is a window pane!!! I love window panes!!! See it Here Right before I went to college, I made a jewelry board as well. However, mine is not as cool as […]
[…] utensil organizers!!!) See it Here This one is a window pane!!! I love window panes!!! See it Here Right before I went to college, I made a jewelry board as well. However, mine is not as cool as […]
I don’t have an old picture frame so I’m just gonna build my own frame with molding. I just need to know what the dimensions are on your frame to get an idea of how big to make it.
Thanks
Hi Brandon! My window frame is approximately 31″ square. Good luck, and great idea!
[…] Image via theborrowedabode.com […]
[…] Full tutorial on theborrowedabode.com […]
[…] You should now create the fabric-covered panels of upholstered foam core board. In the third place you should prepare to install the window screening panels. After you added the screening panels you will get straight to mounting the beautiful paper where your handmade jewelry would go. This is a perfect way to expose your jewelry in a festival, or just a great way to put your own jewelry, so that you can pick everyone you like with ease, at the wall. In this way you can decorate a little your apartment with your own handmade things.The full project on theborrowedabode. […]
[…] Check out step by step instructions via theborrowedabode […]
[…] Tutorial: theborrowedabode.com […]
[…] Supply […]
[…] Tutorial: theborrowedabode.com […]
[…] Here’s a tutorial for making a jewelry display out of an old […]
[…] Window Frame Jewelry Display http://theborrowedabode.com/2011/01/tutorial-window-frame-jewelry-display/ […]
[…] Full tutorial on http://www.theborrowedabode.com […]
Hi! I wanted to know if you sell it already made, please let me know. Thank you
Vanessa Rodriguez
Hi Vanessa, I’m sorry but I don’t!
[…] Turn an old window into a jewelry storage display […]
[…] Jane at The Borrowed Abode re-imagined an old and drab window frame into a cool jewelry organizer that stores jewelry and with that it serves as a decor too. […]
[…] Step-by-step instructions can be found here. […]
[…] Source www.theborrowedabode.com […]
[…] theborrowedabode.com […]
[…] Follow Instructions Here […]
Hi, Did you have any issues with bubbles forming under your fabric? I did and I’m wondering what I did wrong and how I can fix it.
Great tutorial, Thanks!
Hi Kathy, I didn’t have issues with that. However, I laid the fabric flat with the wrong side facing up. I brushed the ModPodge onto the board and then pressed it straight down onto the fabric. I think that is why. If you take the fabric and try to lay it over the board and smooth it out, it won’t work as well. I remember this even though it was years ago. If you have bubbles, you could maybe take a needle or razor blade and cut them open to smooth the air out? I do that when laying sticky shelf paper.
I hope this helps!
[…] a mirrored spice shelf. Other ideas around the web include a beautiful fireplace screen, a nifty jewelry organizer, and a porch […]
[…] Step-by-step instructions can be found here. […]
[…] Tutorial: theborrowedabode […]