

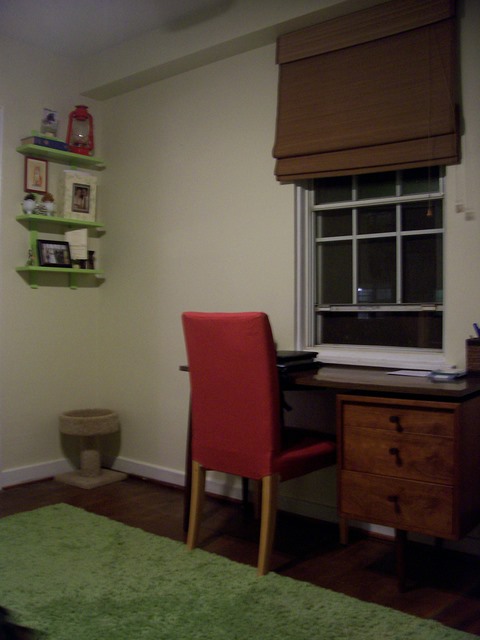
In my new office I was faced with a small storage dilemma. I just hate having clutter on my desk, especially as it is on the smaller side, but I needed a place to store my bills as well as my thesaurus. I looked around and realized I had a number of items that were homeless, so to speak. So I gathered them up and planned a small shelving system to add to a lonely little wall near my desk.
1. Planning the storage space:
It’s a little trick I developed during my attempt to cleverly control my kitchen clutter. I start by placing a few blank post-it notes on the wall near where I need to create a storage solution. Throughout the following days, when I think of something that will need to be stored there, I write it on the post-it. That way I’ve got a working list that I never have to track down each time I’m inspired.

A few days later, with my list pretty much completed, I used a neat trick inspired by Julia @ Open Hand Living (FYI: Julia is no longer blogging, now she’s my Virtual assistant!). Wanting to plan the location of the three shelves ahead of time, I taped out their positions on the wall using blue painters’ tape. Then, riding on a wave of blue-tape-obsession, I decided to make paper and tape models of the items I wanted to store on the shelves. That way I’d be sure to leave enough room between each shelf.

2. Designing the shelves:
In a perfect and oh-so-wealthy world, I would have installed three floating shelves for a clean and modern aesthetic. As my world is neither wealthy nor perfect, I used wood I already had to create a much cheaper alternative. It wasn’t exactly floating shelves, but it was as minimalis as I could create with a simple saw, drill, and some wood I’d rescued from the dumpster at my condo. (I knew it would come in handy some day!)
See, the thing I dislike about traditional shelves with brackets is that the brackets are so often fussy or clunky. I didn’t want to use up any space with brackets. So I created the following bracket-free design (illustrated in my sketch below) like this:
-Attach each horizontal shelf to two vertical (and skinny) strips of wood. Use really long screws to ensure the 5-inch-deep shelf has support. (Mind you, it can’t hold a ton of books, but it will work for decorative items. If needed, I’d strengthen the shelves by installing small L-brackets underneath each shelf.)
-Attach the entire thing to the wall by using one screw at the top of each vertical wood strip.

(Yeah, I know, that’s a work of art. Someday it will be auctioned off as a collector’s item. . .)
I liked this idea because it was landlord-friendly. By that I mean it only requires two screws be placed in the wall. With anchors, of course. (Had I installed three floating shelves, that would have required at least 6 holes.) Also, it was cheap, cheap, cheap! And bracket-free.
3. Actually building the shelves:
Silly me – I expected to buy supplies and build this shelving system in just one weekend day! Yep, I’m overly enthusiastic and optimistic. Not to mention impatient.
2 1/2 weeks later it’s finally constructed, sanded, painted, sealed, and decorated. I painted the shelves with leftover Granny Apple Green paint from my dining room office accent wall. Maybe I should have painted the vertical wood strips the same creamy color as the wall. That may have helped it achieve a more faux-floating shelf effect.

4. Decorating the shelves:
I jazzed it up for the fall season with some pumpkins in my new white ceramic dishes, as well as two little white pumpkin photo/memo holders from good ole’ Tar-jay. Oh, and it holds useful office items, too: my thesaurus, my incoming mail & bills.
5. Bragging about the cheap cost:
Let’s check out the cost breakdown of this bad boy:
- Wood shelves – free, from the dumpster (that tree did NOT die in vain!)
- Paint – free, leftover from wall painting project
- Screws – $4.00
- Paint sealer (there’s a special one just for painted, not stained, wood) – $4.00
- Vertical strips of wood – $2.00
Grand total? $10.00. Not bad, not bad.
Just a little reminder of how the other side of the room looks:

Did you notice this pretty cream-and-green box with the photo of me and Mr. Wonderful on it? Stay tuned, because in a few days I’ll tell you how I made a not cheap, but free, decorative mail storage box! I’ll also tell who created that awesome painting of my first cat, Blossom.


6 Comments
Wow, a steal of a deal! I love that you took on this project from scratch. Also, I’m loving that green!!
Great looking shelves!
Very clever Idea!!
Great use of space! I really enjoyed looking around your blog! What great ideas!!
*Eliza’s blog*
[…] BoxesInspiration: Viva Terra, Pottery Barn Living RoomInspiration: West Elm Living RoomFloored.Clutter Control: Almost-floating office shelvesWindow Shopping: Jenn Ski's Art on EtsyClutter Control: It's in the potQuestion for Readers: To […]
[…] The first to come to mind is my new blogfriend (is that a word?) Julia. When I discovered her blog and read about her thrift store-meets-redecorating obsession this summer I was hooked. She’s absolutely real and honest in her blog, and she can squeeze the last drop from a budget like you wouldn’t believe. Not to be a total sap, but she was the first stranger from the blogosphere who commented on my blog! (And now I can’t hang art without using her method.) […]